WE'VE MOVED

Hello!

Thank you for the amazing 8 years here at A Baked Creation, we can't thank you enough for the memories! But we've decided to move over to a new site - Sincerely, Syl. Please join us there for future posts on all the things you loved here!

Sincerely,
Syl
Showing posts with label honey. Show all posts

Sunday, October 27, 2013

Takahachi Bakery

25 Murray Street
New York City, NY 10007
(212) 791-5550

Despite having visited New York on an annual basis, we love that there's so many neighbourhoods and places to explore in Manhattan. We never stopped by this little corner before and I wish with all my might that something like this would pop up in our home town.
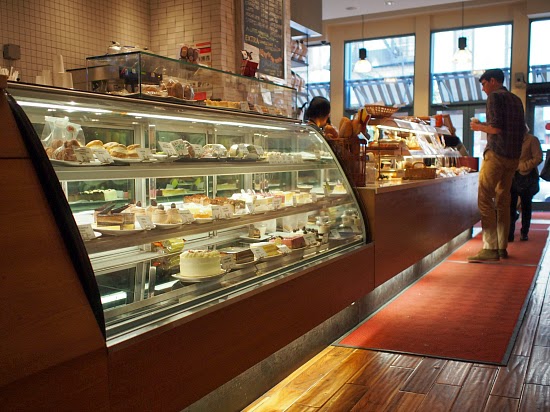
Takahachi Bakery should be on your list of bakeries to visit the next time you're in New York City. They have a great combination of sweet and savoury items available.
Similar to some of the bakeries in Toronto, you can grab a tray, tongs, and pick up the items you wanted. They also had a grab-and-go counter for quick lunches, beverages, or snacks.

At the back of the bakery, they have an area where you can sit and enjoy your purchases while looking on at the bakers through the big windows at the back. They're making everything fresh!
And they have macarons, so they were a must-visit for our macaron tour! We were so full from lunch, so I told Howard we would only get one from each bakery to try. Err... that suggestion went out the window pretty fast.
I couldn't resist! They had lots of our favourite flavours. Black sesame, green tea, passion fruit, and honey ginger. We liked every single one of them. There wasn't a miss in terms of the flavours of the macarons. Each shell had the nice and light meringue cake interior - no hollowness here! The fillings were delicious and were not overly sweet either.

Monday, June 11, 2012

Apple Galette and Tarts

It was my mom's birthday weekend, so I asked her what kind of birthday cake she would like. She said "apple pie." Despite my attempts to persuade her towards a cake, I decided to make her pie. I guess we can be just as celebratory with pie...

Originally, I was thinking of using puff pastry, but I couldn't find any at my closest grocery store. Back home, I went online and realized that I needed to go to a grocery store with President's Choice products! Which I found amusing as I was making these birthday treats with my friend who works at said grocery store. Yes Laura, if you're reading this. I've learnt my lesson, I should always go to Loblaws.

I ended up getting Pillsbury's refrigerated pie crusts. I know, I wasn't making the crust from scratch and I'm thankful for that choice. I don't think it would have turned out well on this extremely hot day.

The store-brought pie crusts were extremely easy to use. We defrosted them for 15 minutes and rolled them out. The pie crusts come in two sheets, for the first one, we made tarts. Using a circle cookie-cutter, we placed the dough into six mini tart pans (they look like this). You can combine all the scraps and roll them out again. For the second sheet, we used it to make the galette. Place the dough on a sheet of parchment paper.

Apple Galette and Tart Filling
Recipe from Essential Pepin 
(Jacques Pépin had his own dough recipe that was omitted here.)

4 Red Delicious apples
2 tablespoons of honey
2 tablespoons of sugar
1/2 teaspoon of ground cinnamon
1 tablespoon of unsalted butter
  1. Preheat your oven to 200°C (400°F).
  2. Peel, halve, and core the apples. Carefully slice the apples to 1/4-inch-thick.
  3. Arranged the sliced apples on the dough. For the galette, keeping them within 1-inch of the edges and slightly overlapping. For the tarts, arrange them with the peeled side out.
  4. Drizzle the honey over the sliced apples.
  5. Mix the sugar and cinnamon together and sprinkle on top of the honeyed apples.
  6. Cut the butter into tiny cubes and dot them over the apples.
  7. For the galette, gently fold the edges inwards. You'll noticed that I did this before step four - oops!
  8. Bake for an hour or until the crust is brown and crisp. The apples should be tender.
  9. Serve the galette and tarts at room temperature. Preferably with ice cream.
Step 3 - arrange the sliced apples.

Step four - drizzling honey over the apples.

Step 5 - sprinkling the cinnamon sugar.

Looking delicious out of the oven!

Instead of vanilla, try pairing your apple tarts with maple and walnut ice cream.

Sunday, May 6, 2012

My Pizza

My Pizza: The Easy No-Knead Way to Make Spectacular Pizza at Home
Written by Jim Lahey
With Rick Flaste
Photographs by Squire Fox

ISBN 13: 9780307886156
ISBN 10: 0307886158
Publisher: Clarkson Potter
Hardcover: 192 Pages

This cookbook has been getting so much buzz, I knew I had to get myself a copy. Especially when Bon Appétit featured Jim Lahey's pizza on the cover of their March 2012 issue. Since then, I've been thinking about making pizza at home.

The recipe for his famous no-knead dough is available online, so you must wonder, what else does the cookbook provide? There is only one dough recipe and the rest of the book is dedicated to red sauce pizzas, white sauce pizzas, no sauce pizzas, toppings, toasts, soups, salads, and a small section of desserts. So really, once you have the basic dough down, you can do whatever you like. That's the beauty of pizza right? You can customize with any toppings you wish.

However, inspiration and ideas are sometimes hard to come by, so the cookbook offers great topping combinations. Like his bird's nest pie. I would have never thought of it! Or the honshimeji and guanciale pie. It looks so tasty! The spicy eggplant pie makes my mouth water too!

When I saw Lottie + Doof's post on Friday, I knew I would be making pizza the next day. I'm so glad I read his experience first. Because the dough did get crusty and felt a little dry to me. I made the dough on Friday night for it to be ready for Saturday's lunch. In the morning, I was ecstatic to see that the dough did rise (why I was doubting it?)!

I divided the dough into four balls and did my best to stretch each one out into a pie shape. They are personal sized, which is nice for a group of 3-4. Taking Lottie + Doof's advice, I went with the simpler pizza for the first one. I didn't have a pizza stone (we used to ... but gave it away), but a baking sheet works just as well (according to Jim). The oven was cranked to the highest we've ever set it to. This is how it turned out:
Not bad right?? The first pizza we made is an all time favourite pizza of mine. When I have a pizza craving, the simple margherita is so satisfying. Tomato, mozzarella, and basil.
If you prefer, add the basil after, but I like the basil nice and crisp. Yum, I'm craving pizza again while writing this post.
Howard's pizza is just loaded with goodness. Tomato, mozzarella, three kinds of mushroom, proscuitto, and more mozzarella.
Howard made another one, you didn't expect him to be full after one, did you?! This one has tomato, mozzarella, and three kinds of mushroom. After the oven time, we placed thinly sliced proscuitto on top with arugula. Absolutely delicious.
The last one we made for my parents. I asked my mom what she wanted and she took out a Vietnamese sausage and started slicing it. We also topped it with three kinds of mushroom. Then we added basil after it came out of the oven. My dad loved it.
Make yourself an appetizer to go with the pizzas. This one's not from the book, but inspired from one of our favourite pizza places in Toronto. Here, we kept it simple by assembling some arugula on a plate. Covered a thin slice of toast with goat brie and sprinkled diced green apple all over the plate. Lastly, drizzled on some honey.
If you have time, make your own crostini, if not, use Grissol Melba toast like us.
I'd say if you're a pizza beginner like us, My Pizza is a great introduction. It covers equipment, ingredients, adjusting to oven types, and even serving strategies. Overall a simple and thorough foundation for delicious pizza. Try it and you'll never want to go back to frozen pizza again!

Thursday, December 29, 2011

Lemon Chewies with Honey

I am back with another cookie post! It is hard not to bake something when all the ingredients are here and the instructions are so simple. There are no reasons why I should not be eating these cookies, especially if they were recommended to me by my colleague, Monique.

I woke up this morning and flipped open The Cookiepedia (for your chance to win a copy, click here). I took the butter and egg out to reach room temperature as I had breakfast. And just so you know, you can make these and eat them before lunch time, they are that easy!
Finished eating breakfast? Preheat your oven to 175°C (350°F).
In your mixing bowl, add 1 stick (1/2 cup) of unsalted butter.

Then pour in 1/2 cup of sugar.

Cream the butter and sugar together until they are light and fluffy.

Add 1/2 teaspoon of lemon zest, mix until incorporated into the butter and sugar mixture.

In a measuring cup, pour in 1/3 cup of honey. Crack an egg and add it with the honey. Use a spoon to stir them together until they are combined. I've never mixed honey with egg before either, but don't worry, it works! Add this to the butter mixture and beat until incorporated.

Add 1 cup of all-purpose flour, 1 teaspoon of baking powder, and 1 teaspoon of kosher salt to the mixture. Mix until the dough comes together, then add 1 more cup of all-purpose flour. Blend until the batter looks smooth.

You can either lightly grease a cookie sheet, use parchment paper, or a silicone mat. Scoop up the batter with your hands and gently roll them into little balls. Flatten them slightly and place them about 2 inches apart on your baking sheet.

Bake for 10-12 minutes until the cookies are set and the bottoms are a golden brown.

While the cookies are cooling, make an easy glaze. Mix 1/2 cup of powdered sugar with 1/2 tablespoon of water. Mix until a glaze starts to form, if the mixture is not runny enough, add more water, a 1/2 teaspoon at a time. If your glaze is too runny, add more powdered sugar. You'll know when you have the right consistency for drizzling over the cookies.

Go on, this is the fun part. The icing doesn't have to look neat, just zig-zag over the lemon chewies.

That was fun wasn't it? Pop these pillowy cookies in your mouth, you can really taste a hint of lemon and honey flavours! I'd want to up the lemon flavours next time, maybe a squeeze of juice or more lemon zest. I'd also have to use regular honey, my wildflower honey may have overpowered it!

Friday, October 7, 2011

Butter Lane Cupcakes

123 East 7th Street
New York, NY 10009
(212) 677-2880

Welcome to Butter Lane! Bakery and a classroom next door. I don't know why it has taken this long for me to visit them.

After all, Cupcakes Take the Cake is always raving about their cupcakes.

Sigh, I love being able to see through the kitchen - where the cupcake magic happens!

You won't only see chocolate and vanilla here. They have lots of great flavours to choose from.

Ohhh they all look good! How do I just pick one?

One of the great things about the menu is that you can choose the cupcake flavour after you pick the frosting flavour.

I went with the cinnamon honey frosting on a chocolate cupcake. Mainly because I had not seen or tried this combination anywhere else. It was a close call with tiramisu, sea salt chocolate, maple pecan, and espresso also on the board.

And you know what? My cupcake did not disappoint! The chocolate cupcake was soft and bouncy, the cinnamon frosting was smooth and delicious (not too much cinnamon, which can get really spicy), and the pool of honey? Smart. I need to try making this!