
WE'VE MOVED

Hello!

Thank you for the amazing 8 years here at A Baked Creation, we can't thank you enough for the memories! But we've decided to move over to a new site - Sincerely, Syl. Please join us there for future posts on all the things you loved here!

Sincerely,
Syl
Showing posts with label icing sugar. Show all posts

Friday, June 3, 2016

Totoro Puffs

Have you seen the original Totoro cream puffs from the Shiro-Hige's Cream Puff Factory in Japan? They are impeccably made, uniform, smooth, and oh-so-cute! I've heard they taste really well too, but since I am not in Japan, I've been fixated on these recently and finally decided to try and make them. Just one tiny problem: I've never made cream puffs before. I took out one of my favourite cookbooks, Sugar Rush, and flipped to Johnny Iuzzini's cream puffs and éclairs recipe. Gave it a through read through a few times and tackled this seemingly simple dough.
Cream Puffs
Recipe from Sugar Rush by Johnny Iuzzini
(Makes about 1 and a half dozen cream puffs or 12 Totoro puffs)

1/2 cup + 2 teaspoon of whole milk
1/2 cup + 2 teaspoon of water
1 stick of unsalted butter
1 teaspoon of granulated sugar
1 teaspoon of salt
1 1/4 cups of bread flour
4 to 5 large eggs
Vegetable oil cooking spray
  1. In a large saucepan, pour in the milk, water, butter, sugar, and salt. Turn the heat to medium-low and wait for it to simmer. Give it a quick stir and then remove it from the heat.
  2. Add the bread flour and stir and knead with a wooden spoon until the ingredients are all combined. 
  3. Return the saucepan to the medium-low heat for 3 to 4 minutes to dry out the mixture a little bit. The dough shouldn't stick to the sides and when you see a skin form on the base of the pan, turn off the heat and transfer the dough to your stand mixer's bowl.
  4. Using your wooden spoon, spread the dough out along the sides of the bowl (see photo above) to help it cool. Let it rest for at least 15 minutes to cool.
  5. Scrape the dough down a bit (if you really built it up) and attach your mixer paddle. On low speed, add 2 of the eggs until it's completely incorporated into the dough. Stop the mixer and scrape.
  6. Add the third egg and mix until it is fully incorporated again. If your dough is too firm, add the fourth egg and mix until combined. The batter should be firm enough to pipe, but not runny. It has to hold its' shape. If it's still too tough, add a fifth egg.
  7. Preheat the oven to 375°F (190°C). Line your baking pans with silicone mats. Use a large round tip on your piping bag, fill the bag with the batter and hold the bag at a 45 degree angle. Pipe pear-shaped puffs on your silicone mat. Space them out at least 2 to 3 inches apart as the puffs will expand during the baking process.
  8. Help reshape any end tips or points with a wet finger (the dough will stick to your dry fingers). Use a smaller round tip to pipe out two ears. Again, help reshape using your finger.
  9. Spray the surface of the dough with a light coat of cooking spray. Then put the pans in the oven and adjust the temperature to 325°F (160°C). 
  10. Bake for 30 minutes. Rotate the pans and continue to bake for another 25 to 30 minutes. Remove from the oven and let the puffs completely cool before decorating or filling.
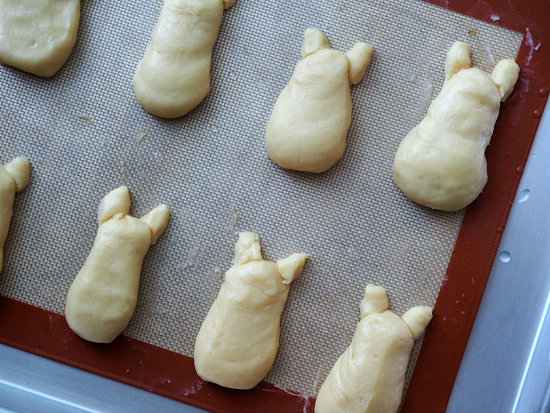
You know what? Piping cream puffs is harder than piping macarons in my opinion. The pear-shape and those ears took me so much longer than I expected. And they still don't look as perfect as Shiro-Hige's. I wonder how they pipe their's out. Also horizontal or vertical? Do they use some sort of mold?
The ears turned out better than I thought they would after much aggravation piping them. But, my poor little Totoros ended up with crevices on their belly. It's like they went to war and came back slashed. Or they're part of the walking dead. Totoro zombies!
For some of the puffs, I ended up decorating the back because it was a lot smoother than the cracked front. I made some icing with powdered sugar and water and piped little dabs on the face to adhere the white round sprinkles. Then another dab on top to stick on the little brown sprinkle for the eyes. Then using the icing as glue, decorated near the ears with stars, hearts, or leaf-shaped sprinkles.
Tried to do some whiskers using jimmies. And gave this one a nose too. I think this one should be General.
She looks like a Lieutenant General, you can tell by her battle scars.
Next, Major General.
The Colonel has a sense of humour.
Okay, Totoro puffs, now let's get into formation.
Formation into my belly.
O.O
Side story: Howard walked in when the puffs were cooling. He peered into the pan and asked if I was making goldfishes. Dishearteningly, I showed him a photo of the Shiro-Hige Totoro cream puffs and he proceeded to laugh for 3 minutes straight. My puffs were apparently that bad. I did save a few and made them into goldfishes for him. =)

Also, I decided not to fill mine with pastry cream, hence I called them puffs in the blog post title instead of cream puffs. But you can by creating a little hole using a chopstick or knife. And then a narrow piping tip to squeeze all that deliciousness into the hollow of the puff. Or you can simply cut off the base and fill it and reapply the base. I did trim the base to help my Totoros stand.

Friday, August 2, 2013

Osmanthus Macarons

Hello, friends! I hope you have wonderful long weekend plans ahead of you. It's almost frightening how fast this year has gone by. Sometimes I still feel like we've just all returned from the Christmas holidays. But it's now more than halfway through the year. Yikes! I don't think I've been blogging as much as I like to be. The other day I wistfully browsed through all my cookbooks to find inspiration and energy and excitement again. I think it worked and I feel like flexing my fingers this weekend.

I made some Osmanthus macarons back in the spring and realized that I didn't share these yet! So I did some quick photo editing and posted the recipe below. To some of my local readers, you might recognize the macaron box - saved from a bakery in Toronto! Any guesses?
Osmanthus Macarons
(Makes about 50-60 shells for 25-30 filled macarons)

1 cup of egg whites (from 7-8 eggs)
2 3/4 cups of almond flour
2 3/4 cups of powdered sugar
3 tablespoons of dried Osmanthus flower
A pinch of salt
3/4 cups of granulated sugar

Separate your eggs and leave the whites out in room temperature while you prepare the flour.
In a food processor, combine the blanched almond slivers, powdered sugar, and Osmanthus flowers together. Pulse until the almond and Osmanthus flowers has been grounded to a fine flour. Be careful and do not grind it to the point where it becomes a paste.
Here comes the tedious task of sifting. I take a large deep pan and gently tap a sieve over it to sift the mixture (try that while also holding a camera). Any bits and parts that don't pass through the sieve are placed back in the food processor for some more blade action.
After, when your arms are aching from sifting, place the egg whites in your stand mixer's bowl. Using the whisk attachment, give it a low whirl to loosen up the egg whites - about a minute. Add in a pinch of salt and up the speed to medium. Pour in the granulated sugar in three parts. When it's all combined, turn the speed up again and wait for stiff peaks to form. To test, remove the whisk attachment and flip it to see if the tip of the egg whites hold or if they droop over. The mixture should feel thick and heavy.

(An aside, the brackets make this an aside, right? I recently read The ACB with Honora Lee and it inspired me to have "O is for Osmanthus" in this post. See photo above.)
Once you've achieved stiff peaks, pour about a third of the almond flour mixture in and give it a good mix so that there isn't a pile of dry almond flour in the bowl. Then add the next third, fold the mixture, and add in the final flour mixture and fold it into the mixture. You want the batter to be firm enough to hold it's shape after piping and runny enough that any lumps and bumps smooth out by itself. Almost like the consistency of yogurt or honey.

Fit your pastry bag with a large-round tip and fill it with the macaron batter. Squeeze small amounts onto your parchment paper to form 2 1/2 inch circles. You can also make them slightly smaller or larger, it's up to you! Just be consistent so you have pairs with the same size. And leave at least 1 inch of space between the piped macarons. Give the tray a good strong tap to smooth out the batter.
Preheat the oven to 300°F/150°C (325°F/162°C for non-convection oven, but we highly recommend using a convection oven). Let the macarons rest for 15 to 30 minutes. Then pop them into the oven and bake for 14 minutes. When ready, take them out to cool before lifting them off the parchment paper.
Osmanthus Pastry Cream
(Makes enough to fill the 25-30 macarons)

2 cups of milk
3 tablespoons of dried Osmanthus flower
6 egg yolks
1/2 cup of sugar
1/3 cup of cornstarch, sifted
3 1/2 tablespoons of unsalted butter
  1. In a small pot, bring the milk and Osmanthus to a boil, set it aside to cool for 10 minutes.
  2. Fill a large bowl with cold water (or ice). In a medium sized pan or small pot, whisk the egg yolks, sugar, and cornstarch together. Gradually whisk in the hot milk. Place the pan over high heat and bring it to a boil, whisking vigorously for 1 to 2 minutes. Set the bowl in the ice bath or cold water and stir until the temperature reaches 140°F (60°C) on an instant-read thermometer. 
  3. Stir in the butter. Cool, cover, and refrigerate.
  4. Once the pastry cream has cooled and set, you can fill a pastry bag with it and pipe it to fill your macarons.

Monday, December 1, 2008

Mango Chiffon Cake

I know, this is an odd time for mangoes. However, my dad bought a box of mangoes last week and they are about ripe now. Just in time for his birthday! This one project took a lot of thought: my parents do not have a sweet tooth (Gasp! I know... where did I get mine from?) and do not like buttercream, icing, or anything with too much sugar.

So, I decided to try a delicately light chiffon cake. The Chinese bakeries around here sell them wrapped in paper (also known as paper wrapped cakes - essentially Chinese cupcakes in my books). Despite it being my first attempt at chiffon cakes, that wasn't enough for me, I wanted to incorporate mangoes as well. So I looked through my collection of cookbooks and stumbled upon one (and I had all the ingredients on hand) in The Martha Stewart Living Cookbook: The Original Classics. Except this one was for lemon chiffon cake. No problem! I'll just substitute mangoes for lemons!

My parents really enjoyed the cake. They liked the texture, the taste, and even had two slices! There is about 1/4 of the cake left. But - yes there is a but - they said it was still too sweet. So instead of 3/4 cups of sugar, mom suggested I use 1/2 a cup next time. Also, feel free to add more mango puree or extract if you want a more distinct taste, this was more on the chiffon side.

Happy Birthday Dad! I'm also using my new cake stand, I just bought it from the William Ashley warehouse sale! Well, I can handle the sugar, so I dusted mine with powdered sugar and drizzled some caramel along the edges.


Mango Chiffon Cake
Adapted from Martha Stewart Living's lemon chiffon cake
(mine made one round 8-inch cake about 2-inches high)

3/4 cups of cake flour
1/4 teaspoon of baking soda
1/4 teaspoon of salt
3/4 cup + 1 tablespoon of granulated sugar
3 large eggs, separated
1/4 cup of canola oil
2 tablespoons of pureed mangoes
1 tablespoon of fresh mango juice
1/2 teaspoon of pure vanilla extract
1/4 teaspoon of cream of tartar
1/3 cup of water

  1. Preheat the oven to 325F. In a medium bowl, whisk together the cake flour, baking soda, salt, and 3/4 cup of granulated sugar.
  2. In a large bowl, whisk together egg yolks, oil, water, mango puree and juice, and vanilla extract.
  3. Stir in the medium bowl's dry content into the large bowl's wet content. Mix until smooth.
  4. With a mixer, beat the egg whites on medium speed until foamy. Add the cream of tartar and then beat on high until soft peaks form (about 1 minute). Add the remaining 1 tablespoon of granulated sugar and beat on high until stiff peaks form (about 2 minutes).
  5. Gradually mix the egg-white mixture into the batter. Then pour the batter into a pan. Bake for 45 minutes or until a cake tester comes out clean from the center. Remove the cake from the oven and set to cool. (In the book, they say that the cake must be cooled upside down, but I kept it right side up and it turned out fine. I didn't want to ruin the nice light brown top.)
  6. Serve with fresh slices of mango. Or in my case, drizzle caramel!
This photo was featured on Photograzing!