WE'VE MOVED

Hello!

Thank you for the amazing 8 years here at A Baked Creation, we can't thank you enough for the memories! But we've decided to move over to a new site - Sincerely, Syl. Please join us there for future posts on all the things you loved here!

Sincerely,
Syl

Tuesday, September 24, 2013

Martha Stewart's Cakes

Remember the books that started it all? Martha Stewart's Cookies, Martha Stewart's Cupcakes, and Martha Stewart's Pies & Tarts. Well guess what? There's now Martha Stewart's Cakes, a collection of loaves, bundts and tube cakes, coffee cakes, single layer cakes, cheesecakes, icebox cakes, and layer cakes.

My colleagues at work wanted to celebrate the release of this new book and asked Barb from Two Enjoy Cake and I to bake a little something for the office. So armed with advance copies of the book (swoon!), we did some baking on the weekend.

I ended up choosing the Vanilla Layer Cake (page 283) because I've already tried the One Bowl Chocolate Cake (twice), a variation of the Chiffon Cake, and a variation of the Pineapple Upside-Down Cake. So let's start with the basics!
Vanilla Layer Cake
Recipe from Martha Stewart's Cakes
(Makes a 3-layer six-inch cake, or a 2-layer eight-inch cake)

1 stick unsalted butter, softened
1 1/2 cups granulated sugar
3 large eggs, room temperature
2 cups all-purpose flour
1 tablespoon baking powder
1/2 teaspoon fine salt
1 cup whole milk
1 teaspoon pure vanilla extract
  1. Preheat your oven to 350°F (175°C). Line your cake plans with parchment paper.
  2. Using a stand mixer on medium speed, beat the butter and sugar until combined, about 1 to 2 minutes.
  3. Add in the eggs and beat until it's well incorporated, it'll look smooth and fluffy.
  4. Add in the flour, baking powder, and salt. Beat until combined.
  5. Add milk and vanilla extract and mix until smooth.
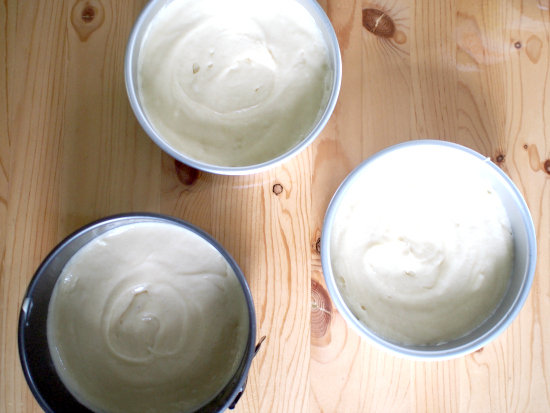
  6. Divide the batter evenly between the prepared pans. I like to smooth out the top of the batters but create a little well or dip in the middle because the cake will rise higher there.
  7. Bake for 35 minutes or until a cake tester comes out clean.
  8. Cool for 15 minutes and turn cakes out on a wire rack to cool completely.
See the little dome? This is normal! Don't fret, as you can level the tops.
I don't like leveling. But it has to be done! Slice the tops off carefully and trim off any excess to make sure each layer is even. Next, the recipe calls for a creamy vanilla frosting.
Creamy Vanilla Frosting
Recipe from Martha Stewart's Cakes
(Makes about 3 3/4 cups)

1 stick unsalted butter, softened
4 ounces cream cheese, room temperature
5 cups confectioner's sugar
1/4 cup whole milk
1/2 teaspoon pure vanilla extract
  1. Using a stand mixer, beat the butter and cream cheese on medium-high speed for about a minute until it's creamy.
  2. Reduce the speed and add in the confectioner's sugar, 1 cup at a time, beating well after each addition.
  3. Slowly add in the milk and vanilla extract. Beat until smooth for about two minutes.
I like to pipe my fillings on to create an even layer, but you can always spoon it on and flatten it with a spatula.
Cover the top and sides with a light coat of frosting. Place the cake in the fridge for 15-30 minutes. This helps seal in all the crumbs. Later, warm up the leftover frosting by giving it a good mix and then plop it on top of the cake. Use a spatula to evenly cover the cake.
This step was extra and isn't in the book, but I couldn't help myself. I love vanilla and chocolate combinations. I mixed up a quick chocolate ganache (semi-sweet chocolate + milk) and glazed it over the cake. This is also known as Sylvia-can't-create-smooth-frosting-sides-and-needs-to-hide-it.
One more shot. There's no such thing as too many chocolate-dripping photos.
You know your office loves cake when there are cake stands available (I didn't have to bring one in). I also made a little bunting out of wooden skewers, string, and printed Avery labels for our friends at Crave. Barb, who makes fabulous treats on Two Enjoy Cake, made Martha Stewart's Double-Chocolate Cake (page 296).
After the obligatory photos (see the behind-the-scene photo here), the team dug into Barb's cake.
Camera phones are a staple for blogging. We had to take photos of the interior!
Here's mine! Those chocolate crispy pearls don't stay still. Next time I'll have to gently nudge them into the ganache.

GIVEAWAY
Thank you for reading all the way to the end here! To reward you, we're giving away three copies of Martha Stewart's Cakes here!

a Rafflecopter giveaway

  • The giveaway contest is open from Tuesday, September 24, 2013 until Sunday, October 6, 2013. Entries submitted after 12 midnight EST on Sunday, October 6, 2013 will not be considered.
  • To enter, leave a comment below telling me which flavour your prefer: vanilla or chocolate?
  • Three winners will be randomly chosen and announced here on A Baked Creation. 
  • This contest is available to residents of Canada and the U.S.A.
UPDATE: Congratulations to Stephanie, Monica H, and another Steph! You will each be receiving a copy of Martha Stewart's Cakes.

Disclaimer: I was given a copy of Martha Stewart's Cakes by a colleague at work. The three giveaway copies are also sponsored by Random House of Canada Limited.

Friday, September 20, 2013

ACE Bakery's Best Sandwich Contest

Hi friends! We just wanted to let you know about Canada's Best Sandwich Contest, hosted by ACE Bakery, Bob Blumer, and food blogger, Julie Van Rosendaal of Dinner with Julie. They're searching coast-to-coast for the country's best sandwich recipe! If you have one or would like to make one up, it's super easy to enter. Make your sandwich, snap a photo of it (totally optional), and submit it here. That's all. And you could win the grand prize!

Canada’s Best Sandwich Contest: 20th Anniversary Edition will be accepting recipes on the ACE Bakery website from now through September 24, 2013. Each entry will then be reviewed by Bob Blumer, Julie Van Rosendaal, and ACE Bakery, and scored based on their taste appeal, creativity, innovation and originality.

On October 7, one regional finalist from Western Canada (British Columbia, Alberta, Saskatchewan and Manitoba), Ontario, Quebec, and Atlantic Canada (New Brunswick, Prince Edward Island, Nova Scotia and Newfoundland) will be announced. Each regional winner will be awarded a $1,000 cash prize, as well as a $1,000 donation to their charity of choice.

The regional winners will then be invited to Toronto to participate in a Sandwich Showdown on October 17, where they will prepare their own recipes. Bob Blumer, Julie Van Rosendaal, and Marcus Mariathas (ACE’s Master Baker) will judge the final creations and decide on the winning recipe. The creator of the winning recipe will be awarded an additional $20,000 – $10,000 cash prize to take home and $10,000 to donate to their charity of choice. Sounds good to me!
As a little nudge and inspiration for you to enter the contest, the lovely folks at ACE Bakery are also sponsoring a $100 gift basket of ACE Bakery products! Enter using the Rafflecopter embedded below.
a Rafflecopter giveaway


Giveaway:
- ACE Bakery will ship the prize directly to the winner.
- Only open to residents of Canada.
- The giveaway ends on September 29, 2013 at midnight.
- Winner will be contacted by email 48 hours after the giveaway ends.
- If you have any additional questions - feel free to send us an email!

    Tuesday, September 17, 2013

    Sunshine Macaroons

    I still don't know how I feel about single-subject cookbooks, but I wanted to take a chance with The Macaroon Bible because my dad loves eating coconut flavoured treats. He claims that he never gets to eat any when I make macaroons - that I give them out too quickly - so this batch was made especially for him.


    The Macaroon Bible
    Written by Dan Cohen
    Photographs by Alice Gao
    Food styling by Vivian Lui
    Prop styling by Kira Corbin
    ISBN 13: 9781118472163
    ISBN 10: 1118472160
    Publisher: Houghton Mifflin Harcourt
    Hardcover: 152 Pages

    Dan Cohen founded New York City's macaroon company, Danny Macaroons, in 2010. His macaroons have just launched in locations across Chicago as well. This book is the result of Dan's experiments, using the basis of a plain macaroon as a blank canvas. What I like about making macaroons is how little equipment you need! It's almost a one-bowl treat!

    In the introduction, there's a few pages for the tools, techniques (with step-by-step photos), a history of the macaroon, and how Dan started up his company. Basically, once you know how to make the original vanilla macaroons, you can start playing with flavour variations. The ones I liked the most from the cookbook were the salted caramel macaroons, piƱa colada macaroons, tiramisu macaroons, stoopid macaroons (inspired by Christina Tosi of Momofuku Milk Bar, they contain pretzels, potato chips, and a Butterfinger bar), coconut s'mores macaroons, chocolate bombs macaroons, and guava macaroons.

    I'd like to seriously applaud the photographer and stylists. It's not easy taking photos of cookies that have a similar exterior look because the difference in flavour isn't always visible. They made each plate, pan, jar, and bowl of macaroons look tasty and inviting.

    Please note that I read through the uncorrected proof of the book, so check with the finished copy for final information and recipes. My little cousin and I teamed up to make some sunshine macaroons from the cookbook. Except, we swapped the orange zest for lime zest (whatever was available in our fridge).

    Sunshine Macaroons
    Recipe adapted from The Macaroon Bible
    (Makes about 24 two-inch macaroons)

    2 large egg whites
    1/4 teaspoon of salt
    10.5 ounces of sweetened condensed milk
    1/2 teaspoon of vanilla extract
    Grated zest of 1 lemon
    Grated zest of 1 lime
    14 ounces of sweetened shredded coconut
    Preheat your oven to 175°C (350°F). Line a baking pan with parchment or a silicone mat. Using a stand mixer or a hand mixer, whisk the egg whites and salt on medium high until stiff peaks form.
    While the mixer is running, zest the lemon.
    And the lime. Easy enough that a 10-year-old can do it!
    Add the vanilla extract to the condensed milk. Mix until all of the coconut shreds have been covered with the condensed milk mixture.
     Add both zests to the shredded coconut mixture. Gently fold the egg whites in.
    Using a round cookie cutter, spoon the mixture in to form 1 centimetre thick.
    Flatten it out with the spoon and gently lift the cookie cutter.
    Or you can free form it by making round balls and flattening the cookies. Place the cookies about an inch apart (the macaroons will spread a little).
    Bake for 20 to 25 minutes. Check for colouring, look for an even, light golden colour. Remove from the oven and let the macaroons rest and cool. The macaroons will keep at room temperature for 3 to 5 days, about 3 weeks in an airtight container in the fridge, or a few months in the freezer.
    Take it to the next step by sandwiching ice cream or frozen yogurt in between two macaroons. Squeeze. Bite. Enjoy!
    Disclaimer: A review copy of The Macaroon Bible was shared with us through NetGalley. There was no incentive or payment exchanged for a review or mention. All opinions are our own.

    Sunday, September 8, 2013

    Banana Bread

    Yes, we have lots of bananas. Some are getting pretty ripe and to prevent my mom from making her usual banana muffins (which I don't enjoy eating), I took a few and made some banana bread.

    A banana bread out of the oven is so comforting, almost like a warm blanket for your tummy. This really hit the spot for Sunday morning breakfast.
    Top: Batter Before
    Bottom: Baked After
    Banana Bread
    Recipe adapted from Flour
    (Makes about 12 banana breads)

    1 cup of granulated sugar
    2 eggs
    210 grams (1 1/2 cup) of all-purpose flour
    1 teaspoon of baking soda
    1/4 teaspoon of ground cinnamon
    1/2 teaspoon of salt
    100 grams (1 cup) of canola oil
    1 1/3 cup of mashed and very ripe bananas
    2 tablespoons of Greek yogurt
    1 teaspoon of vanilla extract
    1. Preheat your oven to 160°C (325°F) and line your muffin tin.
    2. Using a stand mixer with the whisk attachment, beat the sugar and eggs together on medium speed for about 5 minutes. It should look light and fluffy with all the air incorporated.
    3. While the machine is whisking, sift the flour, baking soda, cinnamon, and salt together. Set aside.
    4. On a low speed, slowly pour in the canola oil, don't do it all at once! It should combine with the sugar and eggs in about a minute.
    5. Add in the mashed bananas, yogurt, and vanilla extract. Mix on low until combined.
    6. Fold in the flour mixture with a rubber spatula. Evenly divide the batter into the muffin liners.
    7. Bake for 23-25 minutes or until the tops are golden brown and a cake tester comes out clean.
    Let them cool for 30 minutes or if you're like my family members and can't wait, start eating!

    Tuesday, September 3, 2013

    Backyard Season

    Once Labour Day passes, I start feeling wistful. Where did the summer go? What did I do this summer? 

    This morning at my bus stop, a father and son was waiting there. I'm assuming it was the boy's first time taking the bus to school. His dad stepped back when the bus arrived and headed home, I guess they knew not to embarrass each other. The boy stepped up and politely asked the bus driver to call out his stop, not knowing that stop announcements were automatic now. Thank goodness I don't have children, watching this big milestone made me want to cry. I miss those first-day-of-school new starts!
    We had a great end of August week. My aunts, uncles, and cousins came to visit and we ate. We ate a lot. Chinese food. Vietnamese food. Seafood. Brunch.
    We feasted at home, spread out around the house and in the backyard. Howard impressed us all by grilling some steaks.
    My brother did the seasoning, grinding the pepper mill with grace (ha ha).
    My dad, the backyard farmer, supplies us with so many healthy vegetables to cook with. He grows barrels of Taiwanese lettuce, also known as A-choi.
    Not my favourite, but we have plenty of bitter melon hanging about. Check out what's also hanging on the top left corner of the net. *Shudder*
    This grassy looking one is a favourite of mine, gau choy or Chinese chives. Chop it up and mix it in egg, dough batter, or in a dumpling and I'm a happy camper.
    The bitter melons aren't the only ones hanging out in our backyard. We have sing gua or silk squash too.
    Howard loves pickled sher li hon or mustard greens. I always pick this out of my beef noodle soups.
    Finally, tomatoes! We don't ever need to buy tomatoes during the fall. We simply can't keep up with them. So now that the cooler weather's creeping in, we'll harvest our vegetables and reminiscence about the good old summer times.