WE'VE MOVED

Hello!

Thank you for the amazing 8 years here at A Baked Creation, we can't thank you enough for the memories! But we've decided to move over to a new site - Sincerely, Syl. Please join us there for future posts on all the things you loved here!

Sincerely,
Syl

Monday, March 23, 2015

Canelés (Cannelés)

Canelés are finicky. So much so that there are different spelling variations of this pastry. Before I started this project, all I knew about canelés were that you made them in these beautiful copper molds and that these molds were expensive. Very expensive. Then I did some research and found out that they're from the Bordeaux region in France and are custard cakes! That sounds wonderful, I love Portuguese custard tarts, so I'm sure I would love these, let's get started!

First, let me just find a place in Toronto that sells canelés so I can try them and then look for a recipe. Thanks again to all the lovely people online that pointed me in the direction of Nadège Patisserie. They opened up a new location in Richmond Adelaide Centre in the PATH, so I was able to go during my lunch break to scope out their selection. On top of the gleaming counters filled with macarons, cakes, and other tempting treats, I saw the canelés. Mini canelés to be precise, I bought six (they're mini and it's for research, six isn't too much) to take home and dissect.
Above: canelés from Nadège showing uneven mahogany colouring and a crispy exterior.
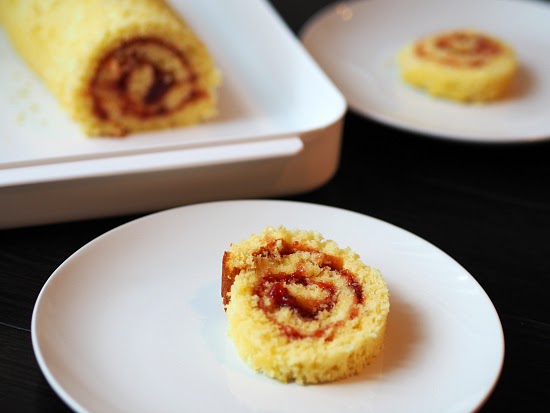
Below: canelés from Nadège showing the custard interior with a good amount of airiness
Verdict: canelés from Nadège are delicious! One of those "wow" moments when you try something good for the first time. I was so excited. I'm going to make these! I'm going to eat so many canelés in my lifetime now.

Time to look for a recipe! Who has the most reliable one? The tastiest one? One that will work with silicon canelés molds?

Stop. Wait. If you're about to embark on a canelés project, read as much as you can about these tricky pastries. Seriously, they're complicated - with varying factors affecting outcomes - and the key to your happiness is in their hands. Evil canelés. I think they're just as troublesome as macarons.

My reading material included Chez Pim who warns you with the word "madness" in the blog title. Yes, these little buggers can cause you to go mad. I was devastated to learn that silicone molds did not yield perfect or consistent results. My silicone mold was not the one recommended and I worried about the quality of silicone mold in my possession. But there was hope, you could make almost perfect canelés. Then there was the issue of beeswax. Where was I going to get beeswax?

I was teetering on hopelessness for short time but then saw these lovely canelés videos from ChefSteps and read about their experiment. Turns out, they found little difference between using beeswax or butter in lining the molds. They included temperatures for both convection and household ovens. They were able to incorporate other flavours. Explained the results comparing all-purpose flour, bread flours, powdered sugar, granulated sugar, and most importantly, the molds. Turns out they were able to make canelés in ramekins, cast iron pans, tart tins, and cupcake trays. But again, silicone molds were not recommended.

But the best part of the posts are reading everyone's comments. You get to see what worked for others, what didn't work - like the silicone mold. One of the commentators was using a similar one as I was and found that if you cut up the mold so that they were singles, the canelés baked more evenly thanks to better air circulation and helped avoid the little collapses.
I spent late nights reading more and more. I scoured my pastry cookbooks and French food cookbooks, only finding two recipes. I read posts from Chocolate and Zucchini, Mimi Thorisson, and followed #projectcannelé online to see how eat. live. travel. write.Crumb, and Now You're Cooking were doing.

Then I came upon Eat, Little Bird; Butter and Brioche, and Notes from My Kitchen and saw that they were able to make beautiful canelés with silicone molds from the same recipe. So began my journey on a Friday night. 

Canelés
Recipe adapted from My Little French Kitchen by Rachel Khoo
(Makes about 20 canelés)

500 milliliters of 2% milk
50 grams of unsalted butter
1 vanilla bean pod, split
100 grams of all-purpose flour, sifted
250 grams of granulated sugar
1 teaspoon of salt
2 eggs
2 egg yolks

In a small saucepan over medium heat, pour in the milk, add the butter and vanilla bean. Bring the mixture to a light boil them remove from heat to cool.
Sift the flour into a large bowl.
Gently add the granulated sugar and salt to the sifted flour and stir to incorporate a bit.
In a separate bowl, lightly beat the eggs and egg yolks together.

When the milk has slightly cooled, remove the vanilla bean pod. Pour the milk and eggs into the bowl with the dry ingredients. Remember, the milk can't be too hot here or your eggs will cook and become scrambled! Gently stir together until smooth (you do not want to incorporate too much air into the batter).

Strain the batter though a sieve into a new clean bowl (preferably one that comes with a lid) until a smooth batter forms. Cover with plastic wrap or the bowl's lid and refrigerate for 48 hours or longer. I gave it a stir after the first 24 hours. So I made the batter Friday night and baked them on Monday morning. This stage is important! Resting the batter yield in a more successful result for most people.
When you are ready to bake, preheat the oven to 240°C (460°F). I did not butter the silicone molds. After all that reading material, I felt that the consensus was that it wasn't necessary for silicone molds.

I used an ice cream scoop to pour the batter in, helping me get an even fill in the silicone molds.
Place filled silicone molds on baking tray and slide into oven. Bake for 15 minutes, then reduce heat to 190°C (370°F) and bake for 50 minutes. To quickly lower the oven's temperature after the first 15 minutes, I left the oven door open and watched my oven thermometer.

I felt that my oven ran hot as the canelés had very dark tops (also, it was hotter there because of the baking tray). For my second batch, I reduced the baking to 10 minutes at 240°C (460°F) (or you could try reducing the baking time to 45 minutes at 190°C (370°F) if you also have a oven that runs hot). It'll be tricky as I don't want the custard to be under baked.
Fresh out of the oven, most of the canelés were the same height, with a few exceptions. You want to take them out of the molds as soon as possible so they can start to cool and harden for the crispy shell.

As you can see up top, the two in the middle and the one above it decided to lean and slant. The rest stayed upright and didn't slouch their backs. Three out of fifteen, not bad for my first try!
Aside from the obvious ones, a few had soft divots on the side, so tiny collapses. This was puzzling as I didn't incorporate any air, but they still puffed up on the oven before turning to a more acceptable size.
Moment of truth, was the centre a nice custard? I sliced through the crunchy exterior and to my delight, found that it was nice and airy inside. Not dense and not too many air pockets, just the right ratio that I like. The perfect crunch and chewy combination!

The original recipe called for powered sugar, but looking at the cross section of those canelés (Butter and Brioche was the only one who posted a photo of the interior), I saw that they were too dense. Recalling the ChefSteps experiments, they found the same results with powered sugar (although the browning on the exterior is more even), so I used the Redpath Special Fine Granulated Sugar. It's not as course as granulated sugar, so a nice medium between powder and granulated. But honestly, I would have went out and gotten powdered sugar if it came with the better result!

Now the trouble I had was storing them. Yes, I didn't gobble all of the canelés up (very tempted to, but I wanted to share these at work) so I placed them in containers and shut the lid on them. I think this created an environment that caused the canelés to soften up and lose their crunchy shell. They were all moist and spongy the next day. Not having that much luck finding lots and blog posts about this next step!

The most helpful thing I could find was from Dominique Ansel website, if you purchase their canelés box, they recommend that you store it in a cold, dry area. Do not refrigerate and they're best consumed fresh but will keep for up to three days. 

No comments on the type of storage, but I guess a pastry box is implied!

Disclaimer: The silicone mold, apron, vanilla bean, and sugar was sent to me from Michelle Galluzzo on behalf of Redpath Sugar. Thank you!

Sunday, March 15, 2015

Favorite Jelly Roll

Are you ready for this jelly? Have you ever wondered how jelly rolls were made? I did, I didn't believe you could roll a sheet of cake - surely it would break and be uncooperative. I thought they were machine made and sold in stores. So when I saw this recipe and the instructional photos, I knew I wanted to tackle it. So today, I'm sharing an excerpt from What to Bake and How to Bake It with my own photos. I actually made this cake twice. You'll see why below!

Favorite Jelly Roll
Recipe from What to Bake and How to Bake It by Jane Hornby
(Makes one jelly roll)

Preparation time: 15 minutes
Baking time: 10 minutes
Makes: 10 slices

A jelly roll was one of the first things I ever baked with my mom, probably because it was so quick to make, and all the ingredients were in the pantry. Although there are lots of steps, be assured that it’s a simple cake, and one of the most popular among friends and family when I was creating the recipes for this book.

INGREDIENTS

For the cake
½ stick (¼ cup) butter, plus extra for greasing
3 tbsp milk
4 eggs, room temperature
¾ cup sugar, preferably superfine
1 tbsp cornstarch
1 cup all-purpose flour
¼ tsp salt

For rolling and filling
¼ cup sugar
¾ cup raspberry jam or jelly
Use plenty of butter to grease the base and sides of a 10 x 15-inch jelly roll pan or rimmed baking sheet, then line the base with parchment paper. Preheat the oven to 400°F. Put the milk and butter in a small pan and heat gently until the butter melts. Set aside (it will need to be warm when you use it).
Put the eggs and the sugar in a large bowl and whisk with an electric mixer at medium speed until thick, moussey, and doubled in volume—about 5 minutes.

Stir the cornstarch, flour, and salt together, then sift them on top of the eggs. Fold together well using a large metal spoon or spatula, cutting and lifting the flour through the foam instead of stirring it. This will preserve the air bubbles and ensure a light and fluffy cake.

Pour the warm butter and milk around the edge of the batter bowl. Using the large spoon or spatula, fold until evenly combined. The liquid can pool at the bottom of the bowl, so be persistent, trying not to knock out too much air.
Carefully pour the batter into the prepared pan, then tilt it slowly from side to side, letting the batter run into the corners. If it still looks uneven, spread out the batter very gently with a spatula. Don’t worry if you see a little dry flour or ribbons of butter—just work them in gently. The batter will completely fill the pan, but don’t worry, it won’t spill over as it bakes.

Bake for 10 minutes, or until it is golden, has risen, and the edges have shrunk away from the sides of the pan. Meanwhile, dust a larger sheet of parchment paper with 2 tablespoons sugar. Loosen the edges of the cake with an icing spatula, then sprinkle the remaining sugar on top.

Swiftly flip the cake onto the sugared parchment paper. Carefully peel off the paper that lined the pan. Using a serrated knife, trim about ½ inch off from each edge. Score a line into the cake about 1 inch in from the short end nearest you. This will make it easier to roll.
While the cake is still hot, roll it up from the short end, rolling the sugared paper inside the cake. Don’t rush things, and if a few cracks appear, don’t worry.

Cover the cake in a clean dish towel and let cool until just warm.
Unwrap and unroll the cake, then spread it with the jam. Roll the cake up again, using one hand to guide it and the other to pull the sugared paper underneath it upwards. This will help keep the spiral fairly tight.

Place on a serving plate, seam-side down. It’s best eaten on the day it is made.
Sylvia: So as you can see, the first cake I made was too stiff and over baked. You don't want the base to be as brown as the one in the photo above. It did confirm my fears of cracks. But I attribute that to being slow on the roll. I was snapping photos and the cake cooled. The second time around, I wasted no time. I watched the cake in the last two minutes of baking. Took it out. Flipped it out of the pan and rolled it in the parchment paper. Success!
Look at that beauty! The cake was nice and fluffy and moist, allowing me to shape it without any fuss. I didn't even trim the sides this time, instead, I did it after the cake was fully assembled to get the nice straight edge. So those are my tips, don't over bake, work fast, and don't let the cake smell fear on you. You will then be rewarded with a delicious jelly roll.

Disclaimer: A review copy of What to Bake and How to Bake It was sent to me for review from Becca Levenson at Phaidon. Thank you! No incentives were used to produce a positive review of this book.

Saturday, March 14, 2015

What to Bake and How to Bake It

What to Bake and How to Bake It
Written by Jane Hornby
Photographs by Liz and Max Haarala Hamilton
Illustrations by Kerry Lemon
ISBN 13: 9780714867434
Publisher: Phaidon
Hardcover: 240 pages

Happy March Break to those of you who have the midweek off! Traffic and the commute to work has already been a breeze on yesterday (sort of), so I want to thank you for that. Well, what do you do for a glorious week? What are your plans? If you don't have any, I suggest doing some baking - with or without your kids - and then bringing the goods back to work the week after.

"But Sylvia, what to bake?" some of you might question. And when I suggest cookies or cakes or brownies or macarons, some of you might ask, "but Sylvia, how to bake it?" Friends, let me recommend Jane Hornby's What to Bake and How to Bake It for all your March Break (and other occasions during the year) baking needs. Her book promptly answers both your questions. She's also the author of What To Cook and How to Cook It and Fresh and Easy for those meals you now have time to make.

But let's get back to the baking. Jane's latest book is divided into Introduction; Simple Family Baking; Morning Coffee and Afternoon Tea; Special Bakes; and Desserts and after Dinner. So you look for the occasion. Did you just wake up? Look for recipes under Morning Coffee. Do you have a birthday or celebration coming up? Check out the Special Bakes. Or because it's March Break and you want fun family activities, you would look under Simple Family Baking for inspiration.

You'll find the recipes useful (for beginners and ... what are bakers between beginner and advance called again? Intermediate?) due to the clear instructions and step-by-step photos. I would highly recommend reading the introduction and looking at all the tools and equipment before starting. I have to admit that I choose cookbooks based on their photographs. I like knowing how the recipe is supposed to turn out. How it it supposed to look like when finished? But then, you go and add process and progress photos and I am just over the moon. It's nice to see how those whisked eggs should look like after 5 minutes. It's nice to see how you're supposed to handle and assemble the cake. I guess you could say I need a little hand holding once in awhile. What home cook doesn't? It's not like we've gone to chef school for training!

Jane was so gracious to take time out of her busy schedule to answer a few questions for me. She's given me concise and thoughtful answers, so please read through to the end.
Syl: With recipes so easily accessible online, how do you make your cookbook stand out?
Jane: I try not to worry about online or it would drive me crazy, as I am primarily a book and magazine writer and earn a living from commissions rather than blogging and online content. Of course the beauty of online is that the two overlap and I can add and write extra material around all of the content in my books online now, getting the best of both worlds. I’m really lucky to work with Phaidon, as design is at their core and all of their books are covet-able objects in their own right. The design of the books works very hard for me, and is actually very familiar to people who follow blogs, with step-by-step photos and comment after each pic. When you need a reliable recipe, I think that nothing beats a book from a trusted author, something you can cherish as an object, trust in that the recipes are tested properly, and share with others.
Syl: Which recipe took the longest to develop and test?
Jane: Probably the coconut layer cake. I find the traditional American-style recipes for this far too sweet, but knew that I had to create something that readers in the USA would recognize. So, I decided to turn the frosting into meringue buttercream and use lemon curd to enhance the coconut and add a bit of zing. After more than a few tries I was happy. Then all I had to do was break it down into as few steps as possible for the overhead photography!
Syl: There are so many variations of recipes out there, how do you know when the recipe is "the one" to include in the cookbook? 
Jane: I have a really clear idea of exactly what I want from a recipe – the rise, the texture, the colour of the crumb even. I don’t stop baking till I get there, via a process of trial and error really, based on my knowledge as a baker and cook. My recipes for Phaidon tend to focus on ‘favourites’ and classics, which you’d think would make it simple…but of course everyone has their own idea of the perfect chocolate cookie or muffin, which is why I try and tick every box! Inventing new recipes is actually a lot quicker, I find, as I’m not trying to match anyone’s expectation of that recipe (aside from it being yummy and working when they cook it).
Syl: The cookbook comes with not one, but two beautiful teal ribbons. Which two recipes would you suggest readers bookmark at all times? 
Jane: I seem to constantly turn to the Blueberry-Cinnamon Crumb Cake (page 114 and watch Jane make them in this video!) and the Fudgy Cheesecake Brownies (page 96). They cover just about any need for cake or dessert.
Syl: What's your favourite dessert in the whole wide world?
Jane: Um…can I have two?
Syl: Yes!
Jane: I’m a total sucker for anything involving cream, crunch and fruit. So I’d say for winter, apple and blackberry crumble with clotted cream and for summer, meringues with berries and a dash of rosewater. Simple pleasures. You won’t find them in What to Bake and How to Bake It though – they are already in the previous two books!
I would comp this book to Illustrated Step-by-Step Baking by Caroline Bretherton. But if I had to choose, I prefer What to Bake and How to Bake It and not just because I'm reviewing it. I even placed Illustrated Step-by-Step Baking in my annual favourite cookbook list back in 2011, but that was before Jane Hornby's came out in 2014. The design is much better in What to Bake and How to Bake It, because even with all the photographs it doesn't feel crowded or overwhelming. There's a clean template and the designers stick to it. The photographs are of higher quality and I like the simple styling of the finished products. The no fuss attitude makes this cookbook inviting and encouraging.

Stick around for tomorrow's post where I make Jane's favourite jelly roll (pictured above).

Disclaimer: A review copy of What to Bake and How to Bake It was sent to me for review from Becca Levenson at Phaidon. Thank you! No incentives were used to produce a positive review of this book.

Thursday, March 12, 2015

Awesome Brownies

With a name like Awesome Brownies, the recipe has to deliver. And I think they do based on two accounts. 
1. I made these and tweeted about it - my coworkers expected brownies in the office the next day. 
2. I made these and packed them up for Howard to bring to work - his coworkers devoured them.

So now there's been a lot of grumbling on both sides. My colleagues are upset that I didn't bring them in and that they went to Howard's colleagues. Howard is now telling me that people are pestering him about when I'll be making more. 

I'm surprised, I thought they would be too rich and that the squares I cut were too big. This is moist, melty, gooey chocolate we're talking about. But the verdict was that the pecans helped lessen the sweetness and added a nice crunchy texture to each bite. 
Awesome Brownies
Recipe adapted from Good Food, Good Life
(Doesn't make enough brownies. Just kidding, makes about 20-24 brownies)

9 ounces of semisweet chocolate (or bittersweet, 61% cocoa or less)
1 stick and 3 tablespoons of unsalted butter
1 1/4 cup of sugar
3 large eggs
1 1/2 teaspoon of vanilla extract
1/4 teaspoon of salt
1 cup of all-purpose flour
1 1/2 cups of chopped pecans

Preheat the oven to 350°F and line a 9 x 9 baking pan with foil. Leave extra foil on the sides to provide as a handle to lift the brownies out when they're finished baking. 
Combine the chocolate a butter over a double boiler to melt. You're only supposed to use 6 ounces of the chocolate and save the rest to mix in after, but I dumped it all in! Let the mixture cool when the butter and chocolate are combined and smooth.
Whisk the sugar, eggs, vanilla, and salt. Whisk in the melted chocolate and butter mixture.
Fold in the flour and then half of the pecans (or 1 cup of pecans if you're following the recipe to a T).
Pour the batter into the lined baking pan (you should spray it with non-stick oil, I forgot) and sprinkle the remaining pecans (and 3 ounces of chocolate if you reserved some instead of melting all of it) on top. Bake the brownies for 28-30 minutes or until a toothpick inserted in the center comes out with just a few moist crumbs attached. Let the brownies cool in the pan.
Using the foil, carefully lift the brownie out from the pan. Use a sharp knife to divide it into squares. Store in an airtight container.

Yummm, just look at that top crust. I think that all brownies should have that shiny crinkle on top. Everything is awesome!
An update: I made them a second time. This time I brought them into my office. =)

Wednesday, March 11, 2015

Almond Falafel

This recipe caught my attention in Curtis Stone's Good Food, Good Life because one - I had all the ingredients on hand and two - I never made falafels before. He notes that falafels are traditionally made with uncooked chickpeas that have been soaked overnight, just until they're partially softened. That's how you get the crunchy texture. But by using canned chickpeas and almonds you can achieve a similar crunch and make falafels on the same day.
Almond Falafel
Recipe from Good Food, Good Life
(Makes about 35-40 falafels)

1/2 onion, chopped
4 garlic cloves
1 tablespoon of ground coriander
1 1/2 teaspoons of ground cumin
1 1/2 teaspoons of salt
1/2 teaspoon of cayenne pepper
2/3 cups of fresh parsley leaves
1/2 cup of fresh cilantro leaves
1 cup of raw whole almonds
2 cups of canned chickpeas
1/3 cup of all-purpose flour
2 tablespoons of toasted sesame seeds
1 1/2 teaspoons of baking powder
Canola oil for deep frying

Have everything out and ready, rinsed and cleaned (canned chickpeas, parsley, and cilantro leaves). Even though it took me a long time to make the first time around, now that I've made it once, it really is quick and easy!
Throw the onion, garlic, ground coriander, ground cumin, salt, cayenne pepper, parsley leaves, cilantro leaves, almonds, and chickpeas into your food processor and pulse until everything is combined. Oh my bejebus, this mixture smells so good in the food processor!
Mix in the flour, sesame seeds, and baking powder. Set up your deep frying station, turn the heat on and as you wait for the oil to reach 350°F, form the falafel mixture into balls with your hands (about 1 and 1/2 tablespoon).
Use tongs or a slotted spoon to gently lower the falafels into the oil to deep fry. I was able to fit six in without the temperature dropping. Keep an eye on your thermometer and fry for 3 to 4 minutes.
They're ready when they're golden brown. Take them out and place on paper towel over a cooling rack. Season with salt.
Tahini Sauce
Recipe from Good Food, Good Life
(Makes about 1 1/3 cups)

1 garlic glove
1/2 cup tahini paste
1/4 cup of fresh cilantro leaves
1/4 cup of fresh parsley leaves
1/4 cup of lemon juice
1/2 cup of cold water
Salt and Pepper to taste

Blend everything in a food processor or mixer! That was easy.
Serve with pitas or tortillas, cabbage or lettuce, tomatoes, cucumbers, and shallots (or if you prefer onions). Make sure you spread in the tahini sauce.
Delicious! I loved pulling the falafel open to see the green colour and heat rise out. Leftovers can be kept in the fridge and warmed up when it's time to eat again. I've only had falafels twice in my life. Once here in Toronto and once in New York City. I think I like these homemade versions better. =)

Best of all, they're really filling and Howard didn't even mind that we were having a meatless dinner!

Tuesday, March 10, 2015

Good Food, Good Life

130 Simple Recipes You'll Love to Make and Eat
Written by Curtis Stone
Photographs by Ray Kachatorian
ISBN 13: 9780449015896
ISBN 10: 0449015890
Hardcover: 304 pages

Sooooo, there's a new Curtis Stone cookbook! I always get excited when I see that there's a new book coming out from him. Usually I find out at sales conference from work and then have to wait an entire year. He once came in to meet with the marketing and publicity department at work and I tried to nonchalantly walk by the boardroom to see if I could spot him or even better - meet him! But no luck, maybe this year!
I'm noticing this trend among a lot of the cookbooks this year, no jacket! And matte interior paper and matte covers with spine wraps. Neutral colours.

Is everyone tired of the glossy and shiny look? I understand that jackets are cumbersome in the kitchen, but they do help protect the book when you accidentally place the book on a wet counter top. Just be extra careful now, you don't want to drop or spill anything by accident to blur out the recipes. But I don't mind this new direction, I'm digging the look. Most cookbooks today are trying to capture a lifestyle compared to the bright and showy cooking shows on television.
Good Food, Good Life is about family and home cooked meals that are humble but tasty. The dedication is made out to Curtis's son, Hudson and the introduction mentions Emerson, the latest addition to his family. You can even make the wedding cupcakes that he made when he married Lindsay Price in the book too. Yes, you can win a girl's heart with food! You can also see that his focus and stories are on raising a family with good food.
Here's a glance at how the cookbook is divided. I mostly tagged recipes for dinner and breakfast. As you can see, I've tagged a lot of them to try. For me, they are mostly weekend recipes because it still takes me awhile to assemble everything, so it's not going to work on a busy weekday for me. I also found that a lot of the recipes I did want to try required firing up a grill, so I had to skip tagging them. A skillet on the stove top might work, but I don't like smoking up my apartment (my exhaust fan in the microwave sucks) and I don't think we're allowed to grill on the balcony. Which is a shame, but maybe I'll take these grill recipes over to my parent's house or borrow a friend's backyard.
Each recipe clearly labels the serving, prep time, cook time, and make-ahead suggestions. I don't know about you, but the prep times are never accurate for me! I'm so slow at getting everything in place before I cook. But I appreciate them just the same, it gives me an estimate (I double it) and I like knowing the cook times so I know when to get up from the couch (stop binge-watching) to make dinner.
If you're someone who fears a long ingredient list like me, I would say that the average would be ten in this cookbook. There are the simpler recipes that use five or less ingredients and then the ambitious projects that list fifteen and over. It really depends on your mood and time.
I wanted to let you a look at a few interior spreads. Most of the recipes include a photograph of the finished products. Others show the ingredients or a picture of Curtis and Hudson prepping and cooking in the kitchen.
The layout is clean and easy to read and the instructions are clear to follow. The photographs look so laid back (even though they're styled) and simple, making the food stand out and really showing you that you can do it, you too can make this dish look good at home. (Why don't my food photos ever look like that?)
Here's Lindsay's Lemonade! I made Lindsay's Guacamole from What's for Dinner? and it's delicious, so I'm expecting the same for this drink.
I have to admit that I prefer What's for Dinner? over Good Food, Good Life a tiny bit, but please keep in mind that the concepts are different between those two cookbooks. I'll be sharing my cooking experience with a few recipes following this post, so return to see how the food turn outs!

And if you ever need a helping hand (sous chef) in the kitchen, you can now get your very own Pocket Curtis! Happy cooking!