WE'VE MOVED

Hello!

Thank you for the amazing 8 years here at A Baked Creation, we can't thank you enough for the memories! But we've decided to move over to a new site - Sincerely, Syl. Please join us there for future posts on all the things you loved here!

Sincerely,
Syl
Showing posts with label vanilla. Show all posts

Sunday, October 11, 2015

Save the Dates

So begins my weekly series about our wedding. I'll be bringing us back to a year ago when we started planning for the big day. And how quickly time flies, we've been married for a month now! The day flew by and so did the honeymoon, I'm wish we were still lounging by the pool right now.

To start it off, the first thing we had to create were the Save the Dates. We sent ours out a year in advance because there was a travel component to it. While we would have loved to do a destination wedding, we knew that there was a chance that key people wouldn't be able to make it. So to incorporate the "destination" part, we opened up what would be considered our honeymoon to be a week long after party.
We sent out the save the dates electronically and to create it, I was inspired by the scripted icing that I spotted on Pinterest. This looked like a delicious way to announce our wedding date!

I whipped up a small batch of royal icing, took out a sheet of parchment paper, and lightly penciled in the cursive words. With shaky hands, I piped out it out in one try! Not bad! But looking back, I wish I made the icing a bit firmer as the loops in the h and e started to blur in. Or at least tried it again on another piece of parchment.
The next step was to decorate around the parchment paper. I poured some dragees into a cocotte (I recommend a funnel, they bounced everywhere). Took out some white coloured heart and star sprinkles and positioned the leftover royal icing and piping bag in the corners.
The next step was the most fun - snapping as many overhead photos as possible. Standing on a chair, I took photos of various angles and positions of the items laid out on my counter top. Then went through them on the computer before choosing one and doing some edits on the brightness.
The text was then added on using PicMonkey (still my favourite online photo editing). At this point, we hadn't decided on a venue in Toronto or a resort in Jamaica yet, so we left the details pretty vague.

But there you have it! We sent these out and even printed a few for family and friends to stick on their fridge.

Friday, December 26, 2014

Skillet Cookie

Happy holidays everyone! We hope you had a great time and totally chilled this boxing day. I'm happy to say we haven't stepped out of the house yet to venture into the crowds. It's nice when there isn't really anything on your immediate shopping list. That's not to say that we don't have items on our wishlist, but nothing is urgent enough to warrant an early wake up to line up at the stores.

We spent Christmas eve and Christmas days with our family. Both of our parents hosted and made hot pot for dinner. Mmm: tofu, mushrooms, radishes, meatballs, fish, scallops, shrimp, and finely sliced pieces of meat.

This morning I made nachos with my favourite guacamole: avocados, tomatoes, shallots, garlic, cilantro, lime juice, salt, and pepper. Tossed in some pomegranate seeds since I was feeling festive. Then a Dutch baby with sautéed apples. It failed. I've made this three times this year, twice it stayed flat and refused to puff up and give me the air pockets I desired. Once (when I actually had guests over) it did and was beautiful and impressive to my brunch crowd. Seriously, I stress over Dutch babies more than soufflés. How is that right? Why does the Dutch baby make me cry?

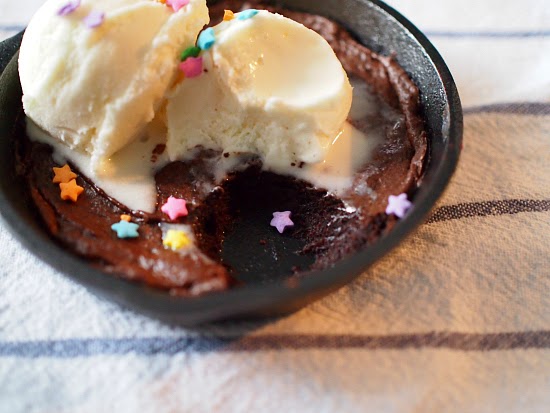
Well, at least this skillet cookie does not disappoint.
Skillet Cookie
(Makes six 5-inch skillet cookies or two 9-inch skillet cookies)

1 1/2 stick of unsalted butter
1 cup of semisweet chocolate chips
1 cup of granulated sugar
2 large eggs
1 cup of all-purpose flour
1/2 cup of cocoa powder
  1. Preheat the oven to 325°F (160°C).
  2. In a microwave-safe bowl, place butter and chocolate in it, then melt on low power for 1-2 minutes.
  3. Whisk in sugar until smooth. Let it cool, if you don't the eggs will cook too fast when you put them in.
  4. Whisk in the eggs until combined.
  5. Add in the flour and cocoa powder. The mixture will be very dark, thick, and shiny (see the first photo).
  6. Scoop and place into skillet, about half full. Bake for 10-12 minutes or until the batter loses the shininess.
  7. Cool for a few minutes and top with ice cream and sprinkles!
Don't over bake these, you want them to be soft and gooey. They're best when they're still warm. If you don't have enough skillets (who does?? Why would any of us own that many mini skillets?), you can use a small ice cream scoop to divide the batter and drop onto parchment paper as drop cookies.

Saturday, August 2, 2014

Vanilla Plum Swirl Pudding Pops

Ice cold pops are always a good sign on a hot summer day. Tasty and refreshing, these are easy to make, even for a newcomer like me. I went out a bought some ice pop molds at my local grocery store and proceeded to create wonderful swirls on the stove top.

Vanilla Plum Swirl Pudding Pops
Shopping List: granulated sugar, cornstarch, vanilla bean, milk, brandy, eggs, salt, plums, and lemon juice.
To make the pudding, give the sugar, cornstarch, and vanilla bean a quick whisk in a saucepan. Pour in the milk (omit the brandy if you're going alcohol-free) and cook over medium heat. Keep stirring with the whisk until the mixture starts to steam.
In a separate bowl, whisk the eggs and salt together. Slowly pour in half of the hot milk mixture and whisk constantly. You don't want to cook the eggs too quickly, if you do, you'll end up with scrambled eggs! Pour the egg mixture back into the saucepan, whisking over medium heat until it starts to get bubbly and thick. Strain through a sieve into a container, place plastic wrap on the surface, and refrigerate for at least 3 hours.
To make the plum swirl, bring the plums, sugar, and 3 tablespoons of water to a boil in a saucepan over medium heat. Simmer and stir until the plus are broken down. It should resemble the consistency of jam. Strain through a sieve into a container, stir in lemon juice, and refrigerate for at least 45 minutes.

If any of the pudding or plum instructions are holding you back, don't worry. Watch the step-by-step video here.
Here comes the fun part! Spoon the pudding into the tip of the molds, then alternate with the plum mixture. Make sure you start and end with the pudding.

Freeze until firm for about five hours. Take them out at the hottest time of day (or any time of day) and enjoy!

We loved how the vanilla pudding was a smooth and delicious base. We'd try this again with plum or another summer fruit, it would pair well with almost anything!
Share your Vanilla Plum Swirl Pudding Pops pics with @canadianliving on Twitter, Facebook, and Instagram with the hashtag #CLIMadeIt.

Disclaimer: This is a sponsored post by Canadian Living and I received compensation for it. There was no requirement to produce a positive review of this recipe. All opinions are our own.

Tuesday, July 15, 2014

Seconds

Happy book birthday to Seconds by Bryan Lee O'Malley! I've waited a very long time for this book to release. You might be thinking, so what? Everyone had to wait a long time for this book. Well, that's true, so I guess I should rephrase and say that I've waited a very long time to share these cupcakes with you! I made these two years ago (May 2012) based on a rough draft of Seconds that Bryan's Canadian editor kindly shared with me. The rough draft I had was only 14 pages long at that time and thank goodness the look of the main character didn't change!
If you're still trying to place Bryan Lee O'Malley's name, he's the author of the bestselling Scott Pilgrim series (there's even a film, Scott Pilgrim vs. the World). Seconds is his new stand-alone graphic novel about a restaurant owner named Katie.
Katie is going through some tough times as she attempts to open up a second restaurant, make friends, find love, and keep a house spirit happy.
She's given a second chance to magically alter her outcome (by consuming mushrooms), but abuses her new-found power to keep changing destiny. So, uh, you know. Nothing good can come from that.
By the way, the cupcakes were vegan. Some of you might get that reference from Scott Pilgrim!
Hope you get a chance to read Seconds or pick up some of Bryan's other works. If not, I'm not sure that a magic mushroom will be able to help you!

Friday, June 13, 2014

Cook the Cover: Canadian Living July 2014

You don't even know how excited I was to see this cover recipe!

Grilled peach? It's one of our favourite summertime desserts, made popular last year when we repeatedly had grilled pound cake with grilled peaches and vanilla ice cream. There's something wonderful in seeing grilled marks on fruits and vegetables, something different from the usual meat selection.

This sundae is pretty easy to make and the raspberry sauce can be made ahead of time so that when you're ready to eat, all you have to do is grill the peaches and scoop the ice cream. Almond slivers can be optional, but they provide a nice crunchy texture if you have the time to give them a quick toss in the oven.

Grilled Peach Melba Sundae
Shopping List: unsalted butter, brown sugar, peaches, vanilla ice cream, raspberries, sliced almonds, granulated sugar, lemons, and cornstarch.
I love summer for the abundance of fruits!
Here's me showing you that a scale is the best thing you can invest in when you're following recipes. It works so much better. For the sauce, I have a cup of raspberries there and showing you what 250 ml of raspberries look like. There's a huge difference!
The raspberry sundae sauce is super easy, just throw in the raspberries, sugar, lemon juice, and 1 tbsp water in a blender. Strain the sauce through a sieve into a saucepan (discard seeds). Cook the sauce over medium heat, stirring, for about 2 minutes until it is warmed through.

Whisk the cornstarch with 1 tbsp water and then stir it into raspberry mixture. Bring the sauce to a boil, keep stirring until it thickens, about 1 minute. Transfer to bowl (or jar in my case) and cover and refrigerate to cool completely, about 40 minutes. You can even make this sauce a week in advance and leave it in the fridge until you need it.
Remove the skin from the peaches and cut them into wedges. Mix softened butter with brown sugar.

Heat the grill pan over medium heat (or if you have a barbecue, use that) and place wedges on to get the charred markings. Turn over to do the same. Near the end, brush the butter and brown sugar mixture on and flip once. You have to watch carefully as it caramelizes very quickly. Remove from the grill and let it cool.
Serve with ice cream, raspberry sauce, raspberries, and toasted almond slivers.
Yes?
Yes to grilled peaches.
Yes to raspberries.
If you've never grilled fruits before.
Do it.

If you've never grilled peaches before.
I highly recommend that you do it.

There's just a wonderful mix of flavour and aroma when a peach is getting its grill marks on. Come on, there's no excuse, this is an easy sundae to make and a sure crowd-pleaser. I don't know how else I should convince you!

See what other bloggers thought about the recipe here.

Disclaimer: This is a sponsored post by Canadian Living and I received compensation for it. There was no requirement to produce a positive review of this recipe. All opinions are our own.

Tuesday, September 24, 2013

Martha Stewart's Cakes

Remember the books that started it all? Martha Stewart's Cookies, Martha Stewart's Cupcakes, and Martha Stewart's Pies & Tarts. Well guess what? There's now Martha Stewart's Cakes, a collection of loaves, bundts and tube cakes, coffee cakes, single layer cakes, cheesecakes, icebox cakes, and layer cakes.

My colleagues at work wanted to celebrate the release of this new book and asked Barb from Two Enjoy Cake and I to bake a little something for the office. So armed with advance copies of the book (swoon!), we did some baking on the weekend.

I ended up choosing the Vanilla Layer Cake (page 283) because I've already tried the One Bowl Chocolate Cake (twice), a variation of the Chiffon Cake, and a variation of the Pineapple Upside-Down Cake. So let's start with the basics!
Vanilla Layer Cake
Recipe from Martha Stewart's Cakes
(Makes a 3-layer six-inch cake, or a 2-layer eight-inch cake)

1 stick unsalted butter, softened
1 1/2 cups granulated sugar
3 large eggs, room temperature
2 cups all-purpose flour
1 tablespoon baking powder
1/2 teaspoon fine salt
1 cup whole milk
1 teaspoon pure vanilla extract
  1. Preheat your oven to 350°F (175°C). Line your cake plans with parchment paper.
  2. Using a stand mixer on medium speed, beat the butter and sugar until combined, about 1 to 2 minutes.
  3. Add in the eggs and beat until it's well incorporated, it'll look smooth and fluffy.
  4. Add in the flour, baking powder, and salt. Beat until combined.
  5. Add milk and vanilla extract and mix until smooth.
  6. Divide the batter evenly between the prepared pans. I like to smooth out the top of the batters but create a little well or dip in the middle because the cake will rise higher there.
  7. Bake for 35 minutes or until a cake tester comes out clean.
  8. Cool for 15 minutes and turn cakes out on a wire rack to cool completely.
See the little dome? This is normal! Don't fret, as you can level the tops.
I don't like leveling. But it has to be done! Slice the tops off carefully and trim off any excess to make sure each layer is even. Next, the recipe calls for a creamy vanilla frosting.
Creamy Vanilla Frosting
Recipe from Martha Stewart's Cakes
(Makes about 3 3/4 cups)

1 stick unsalted butter, softened
4 ounces cream cheese, room temperature
5 cups confectioner's sugar
1/4 cup whole milk
1/2 teaspoon pure vanilla extract
  1. Using a stand mixer, beat the butter and cream cheese on medium-high speed for about a minute until it's creamy.
  2. Reduce the speed and add in the confectioner's sugar, 1 cup at a time, beating well after each addition.
  3. Slowly add in the milk and vanilla extract. Beat until smooth for about two minutes.
I like to pipe my fillings on to create an even layer, but you can always spoon it on and flatten it with a spatula.
Cover the top and sides with a light coat of frosting. Place the cake in the fridge for 15-30 minutes. This helps seal in all the crumbs. Later, warm up the leftover frosting by giving it a good mix and then plop it on top of the cake. Use a spatula to evenly cover the cake.
This step was extra and isn't in the book, but I couldn't help myself. I love vanilla and chocolate combinations. I mixed up a quick chocolate ganache (semi-sweet chocolate + milk) and glazed it over the cake. This is also known as Sylvia-can't-create-smooth-frosting-sides-and-needs-to-hide-it.
One more shot. There's no such thing as too many chocolate-dripping photos.
You know your office loves cake when there are cake stands available (I didn't have to bring one in). I also made a little bunting out of wooden skewers, string, and printed Avery labels for our friends at Crave. Barb, who makes fabulous treats on Two Enjoy Cake, made Martha Stewart's Double-Chocolate Cake (page 296).
After the obligatory photos (see the behind-the-scene photo here), the team dug into Barb's cake.
Camera phones are a staple for blogging. We had to take photos of the interior!
Here's mine! Those chocolate crispy pearls don't stay still. Next time I'll have to gently nudge them into the ganache.

GIVEAWAY
Thank you for reading all the way to the end here! To reward you, we're giving away three copies of Martha Stewart's Cakes here!

a Rafflecopter giveaway

  • The giveaway contest is open from Tuesday, September 24, 2013 until Sunday, October 6, 2013. Entries submitted after 12 midnight EST on Sunday, October 6, 2013 will not be considered.
  • To enter, leave a comment below telling me which flavour your prefer: vanilla or chocolate?
  • Three winners will be randomly chosen and announced here on A Baked Creation. 
  • This contest is available to residents of Canada and the U.S.A.
UPDATE: Congratulations to Stephanie, Monica H, and another Steph! You will each be receiving a copy of Martha Stewart's Cakes.

Disclaimer: I was given a copy of Martha Stewart's Cakes by a colleague at work. The three giveaway copies are also sponsored by Random House of Canada Limited.

Tuesday, December 11, 2012

Snowmen Macarons

This Christmas, instead of going out and buying sweets, I decided to make them for my colleagues. This was the weekend to make them as some of my coworkers start their holiday next week (including myself)!

I knew I wanted to make macarons again, they're quite the hit in our area, we've even celebrated birthdays with macarons instead of cupcakes lately! Now, to look for festive macaron ideas, I browsed a number of blogs before coming across these from Steph at Raspberri Cupcakes (an amazing blog - go check it out). Ridiculously cute, right?

French Meringue Macarons
Recipe from Macarons
(Makes about 48 snowmen macarons)

2 3/4 cups of almond flour
2 3/4 cups of powdered sugar
1 cup of egg whites (from 6-7 eggs)
A pinch of salt
3/4 cups of granulated sugar.
  1. The first step in making successful macarons is to age your egg whites. Yes, we know, this sounds odd, but follow these strict instructions! So separate your egg whites 2-3 days before baking. Store them in the refrigerator - covered. Two hours before you start making your macarons, take the egg whites out of the refrigerator, uncover them, and let them come to room temperature. That's not too difficult! Just keep this in mind during your planning stage.
  2. Next, sift the almond flour and powdered sugar. If you have a food processor, put both ingredients in to create as fine as a texture as possible. This helps create smooth macarons.
  3. Using the whisk attachment on your mixer, whisk the egg whites with the salt. Pour the granulated sugar in three stages. Dumping it all in can deflate the egg whites, so you want to add a little bit at a time. When the egg whites reach stiff peaks, you're done!
  4. Fold the sifted almond flour and sugar with the egg whites. You want to end up with a smooth batter that creates a ribbon when you lift it up from your spatula.
  5. When the batter is ready, fill your piping bag and pipe the body of the snowmen on parchment paper. Then go back and add the head of the snowmen. Carefully tap your tray against the table or counter to eliminate air bubbles.
  6. Add three silver dragées for buttons as the macarons are resting. Let them rest in room temperature for 15-30 minutes.
  7. Preheat the oven to 300°F (325°F for non-convection oven, the cookbook recommends using a convection oven because of the even distribution of heat).
  8. Bake your first tray of macarons for 14 minutes. After the first five minutes, open the oven doors to let out some of the steam.
  9. When they're done, let them cool for 5 minutes and then gently peel the macarons off the parchment paper.
Snowmen with silver buttons and feet!

Phew! Adding the decoration on top of the macaron batter was a first, so I'm glad that worked out!

After the macarons were cooled and rested, I used my handy orange edible ink pen to draw on the carrot noses.

Then, using the black edible ink pen for the eyes and mouth.

Look at them! I filled these bad boys with vanilla pastry cream!

Vanilla Pastry Cream
Recipe from Desserts by Pierre Hermé
(Makes enough to fill each macaron, with leftovers)

2 cups milk
1 vanilla bean, halved and scraped
6 egg yolks
1/2 cup sugar
1/3 cup cornstarch, sifted
3 1/2 tablespoons butter
  1. Flatten the vanilla bean and slice it open with a sharp knife. Peel the bean open and scrape the seeds out with the knife. 
  2. In a small pot, bring the milk with the vanilla bean with scrapings to a boil, set it aside to cool for 10 minutes; remove bean. 
  3. Fill a large bowl with cold water (or ice). 
  4. In a medium sized pan or small pot, whisk the egg yolks, sugar, and cornstarch together. Gradually whisk in the hot milk. 
  5. Place the pan over high heat and bring it to a boil, whisking vigorously for 1 to 2 minutes. Set the bowl in the ice bath or cold water and stir until the temperature reaches 140°F (60°C) on an instant-read thermometer. 
  6. Stir in the butter. Cool, cover, and refrigerate.
Here's the second tray!

Gosh, they're really cute.

I only did a round macaron for the back of the snowmen. I think I should have made the full body for the back too.

Next time!

Here are some happy snowmen frolicking in the snow.

These ones don't look as happy.

Nor do these, a big snowstorm would mean getting covered up!

To package up my snowmen macarons, I went to find cute little take-out boxes. There were so many festive boxes to choose from, but I thought these Santa ones were really eye-catching!

Carefully tucking the macarons in with parchment paper. Everyone gets five! Is five enough?

I had extra snowmen macarons, so I placed them in sandwich bags and twist-tied them. It wasn't difficult to find homes for these ones in the office.

Disclaimer: This year, A Baked Creation is partnering up with Robin Hood®, who is celebrating the 30th anniversary of their annual Holiday Recipe Collection. They were kind enough to send us a baking package and it included the silver dragées!

So glad we could put them to good use already! Here's to the first of many baking memories this season!