WE'VE MOVED

Hello!

Thank you for the amazing 8 years here at A Baked Creation, we can't thank you enough for the memories! But we've decided to move over to a new site - Sincerely, Syl. Please join us there for future posts on all the things you loved here!

Sincerely,
Syl

Sunday, December 30, 2012

Matcha Macarons

I made these matcha macarons for my dad today. He has to attend a holiday potluck party tomorrow and he asked me to make him macarons. He claims that with all these macarons I've made, he's only eaten three. Which is possible as I haven't had that many myself. I keep giving them away! In fact, I only got to snack on two of these matcha macarons. My mom stole one and my dad prevented my brother from taken any. I hope dad's party guests appreciate how much we refrained!

French Meringue Macarons
(Makes about 40-50 macarons)

2 3/4 cups of almond flour
2 3/4 cups of powdered sugar
3 tablespoons of matcha powder
1 cup of egg whites (from 6-7 eggs)
A pinch of salt
3/4 cups of granulated sugar
Festive sprinkles for decoration (optional)
  1. Line your baking trays with parchment paper.
  2. Separate your egg whites 2-3 days before baking. Cover and store them in the refrigerator. Two hours before you start making your macarons, take the egg whites out of the refrigerator, uncover them, and let them come to room temperature.
  3. Sift the almond flour, powdered sugar, and matcha powder together. If you have a food processor, put the ingredients in to create as fine as a texture as possible. This will help create smooth macaron shells.
  4. Using the whisk attachment on your mixer, whisk the egg whites with the salt. Pour the granulated sugar in three stages. Dumping it all in can deflate the egg whites, so you want to add a little bit at a time. When the egg whites reach stiff peaks, turn the mixer off.
  5. Fold the sifted almond mixture with the egg whites. You want to end up with a smooth batter that creates a ribbon when you lift it up from your spatula.
  6. When the batter is ready, fill your piping bag and pipe equal rounds on the parchment paper.
  7. Carefully tap your tray against the table or counter to eliminate air bubbles.
  8. After piping, add the sprinkles on top. Let the macarons rest in room temperature for 15-30 minutes.
  9. Preheat the oven to 300°F/150°C (325°F/160°C for a non-convection oven, although a convection oven is preferred for baking macarons).
  10. Bake your first tray of macarons for 14-15 minutes. After the first five minutes, open the oven doors to let out some of the steam.
  11. When the macarons are done, let them cool and then gently peel the macarons off the parchment paper.
After all the macarons have cooled, I usually pair them up and store them in a container while I prepare the filling:
Matcha Buttercream
(Makes enough to fill 40-50 macarons)

1/2 stick of unsalted butter, room temperature
1/2 stick of cream cheese
3 tablespoons of matcha powder
2 1/2 cups of powdered sugar
1 teaspoon of milk
  1. Using a mixer, beat the butter and cream cheese together until smooth.
  2. Add in the matcha powder and powdered sugar. Mix until incorporated.
  3. If you find the consistency to be too stiff, add a teaspoon of milk and mix until the buttercream is smooth. Fill your piping bag and pipe out a dollop on the bottom of the macarons. Add the top of the macaron and gently sandwich the buttercream in between.
Yum! I can see these being a repeated favourite with my parents. I'm actually tempted to make another batch already...
Have a wonderful New Year's Eve tomorrow!

Friday, December 21, 2012

Butter Avenue

Pâtisserie and Café
3467 Yonge Street
Toronto, ON M4N 2N3
(647) 341- 8686

They're on Facebook and Twitter too!

Oh I am so excited to share this with you! Although, it's most likely that you've already paid Butter Avenue a visit and you're rolling your eyes at my ridiculously late arrival. Friends have raved about this place, but it wasn't until I saw that they serve Afternoon Tea that I asked Howard to take me there for a date.

The Afternoon Tea menu includes an amuse-bouche, macarons, mini tarts, cakes, and specialty teas. Take a look at Kitchen Frolic's blog here.

So you would think this post would be about our Afternoon Tea experience... but no, I screwed up. I didn't realize we had to make reservations first. But, this means we're making a return trip, because we made the reservation right then and there!

I wasn't going to leave without trying something, I mean, you try looking at the display cases and walking out. Howard and I shared the St. Honoré aux Macarons, consisting of crème chantilly pistachio, fresh raspberries, and raspberry macarons.

Macarons on a tart? Fresh fruit? Light crème? Yes, please!

I ... uh ... also got six macarons to snack on. Howard did scold me and said I should have gotten these to go and that I wouldn't be able to finish them.

Well, I showed him! And he had to eat his words because he ate the halves of five of those macarons!

I picked out the white chocolate strawberry, cream cheese passion fruit, matcha chestnut, earl grey, oolong, and the sea salt caramel macarons to try.

Our top favourite favourites? It's hard to choose, but we really enjoyed the sea salt caramel, oolong, passion fruit, matcha chestnut, white chocolate strawberry, and the earl grey. Yeah, I just listed them all again. Like I said, it's hard to choose!

They were very kind to let me snap some more photos of the lovely treats we'll be coming back to try! The above is the St. Honoré aux Fraises: strawberry chantilly, pâte sucrée, candy cane macarons, and fresh strawberries. Now that I think about it, I should have ordered this one, because it looks like a seasonal one. Fingers crossed that it'll still be there in January.

St. Honoré Cassis: crème chantilly cassis, fresh blueberries, and Secret Garden macarons. What are Secret Garden macarons?!?

I didn't get a photo of the lovely treat behind, but it's the Château De Framboise: chocolate, almond, and raspberry.

Terre Et Neige: matcha and dark chocolate.

Nutty Dark Chocolate.

Mini macarons! In a bubble tea cup? Cute!

The next few photos are just rows and rows of beautiful macarons. Enjoy!
Dreamy isn't it? Do you think they'd let me work there part-time? ;)

Tuesday, December 18, 2012

Festive Macarons

More macarons Sylvia? Really?

Yes, I know. I'm going crazy over macarons this year. I made some more to bring to a holiday party and I'm loving how I can customize and decorate these delicate cookies.
French Meringue Macarons
Recipe from Macarons
(Makes about 40-50 macarons)

2 3/4 cups of almond flour
2 3/4 cups of powdered sugar
1 cup of egg whites (from 6-7 eggs)
A pinch of salt
3/4 cups of granulated sugar
  1. The first step in making successful macarons is to age your egg whites. Separate your egg whites 2-3 days before baking. Cover and store them in the refrigerator. Two hours before you start making your macarons, take the egg whites out of the refrigerator, uncover them, and let them come to room temperature.
  2. Sift the almond flour and powdered sugar together. If you have a food processor, put both ingredients in to create as fine as a texture as possible. This helps create smooth macaron shells.
  3. Using the whisk attachment on your mixer, whisk the egg whites with the salt. Pour the granulated sugar in three stages. Dumping it all in can deflate the egg whites, so you want to add a little bit at a time. When the egg whites reach stiff peaks, turn the mixer off.
  4. Fold the sifted almond flour and sugar with the egg whites. You want to end up with a smooth batter that creates a ribbon when you lift it up from your spatula.
  5. When the batter is ready, fill your piping bag and pipe circles on the parchment paper.
  6. Carefully tap your tray against the table or counter to eliminate air bubbles.
  7. After piping, add the sprinkles on top. Let the macarons rest in room temperature for 15-30 minutes.
  8. Preheat the oven to 300°F (325°F for non-convection oven, although convection oven are preferred for macarons).
  9. Bake your first tray of macarons for 14 minutes. After the first five minutes, open the oven doors to let out some of the steam.
  10. When they're done, let them cool for 5 minutes and then gently peel the macarons off the parchment paper.
If you need some  macaron tutorials or visuals, check out the three videos that Mardi of eat. live. travel. write. made. She shows the three main stages of making macarons: whipping the egg whites, folding the batter, and piping the macarons. Chances are, one of those sections are where most people get stuck!
Vanilla Pastry Cream
Recipe from Desserts by Pierre Hermé
(Makes enough to fill each macaron, with leftovers)

2 cups milk
1 vanilla bean, halved and scraped
6 egg yolks
1/2 cup sugar
1/3 cup cornstarch, sifted
3 1/2 tablespoons butter
  1. Flatten the vanilla bean and slice it open with a sharp knife. Peel the bean open and scrape the seeds out with the knife.
  2. In a small pot, bring the milk with the vanilla bean with scrapings to a boil, set it aside to cool for 10 minutes. Remove the vanilla bean.
  3. Fill a large bowl with cold water (or ice).
  4. In a medium sized pan or small pot, whisk the egg yolks, sugar, and cornstarch together. Gradually whisk in the hot milk.
  5. Place the pan over high heat and bring it to a boil, whisking vigorously for 1 to 2 minutes. Set the bowl in the ice bath or cold water and stir until the temperature reaches 140°F (60°C) on an instant-read thermometer.
  6. Stir in the butter. Cool, cover, and refrigerate.
  7. Fill a piping bag with the pastry cream to pipe.
Top tier: I made holly using three red confetti sprinkles. For the holly leaves, I used two tree sprinkles.
Bottom tier: I simply placed red, green, and white confetti sprinkles on the macarons - this one is the easiest as they'll look festive no matter what.
You can go an even simpler route and place one festive icon in the middle of the macaron, here I chose the Christmas tree.

Something even easier, add some coloured sugar sprinkles in a line or waves. I did a few in red, green, and white which creates a nice shimmer and adds a crunchy texture to your macaron.

A tip, do not use jimmies or nonpareils, the colour on these will bleed off and smudge the look or design you're going for. Probably any kind of sprinkle that looks glossy will not work, stick to the matte ones! Happy macaron designing!

Monday, December 17, 2012

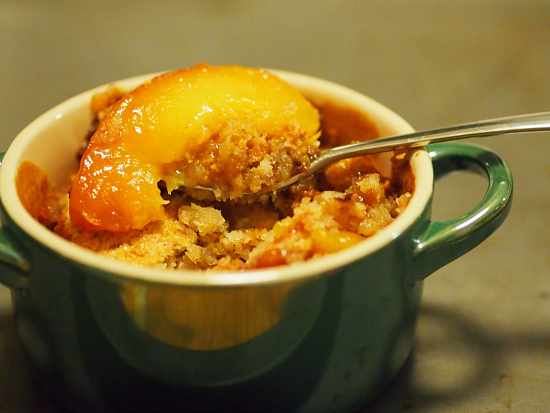
Dulce Strawberry, Peach, and Mango Cobbler

We meant to make a Dulce Peach Cobbler dessert for our friend's holiday potluck party on the weekend. It was going to be a nod to one of our favourite dessert at this little barbecue place near their house.

But after searching two grocery stores and not finding the frozen peach, we eventually picked up a bag of frozen strawberry, peaches, and mangoes.

This was fine by us, those are still three of our favourite fruits!

Dulce Strawberry, Peach, and Mango Cobbler
Recipe adapted from Robin Hood® Bake Some Memories™ Recipe Booklet
(Makes 8 servings)

Filling:
1 can (300 mL) of Eagle Brand® Dulce de Leche caramel flavoured sauce
1 bag (600 g) of Europe’s Best® Caribbean Treasure, frozen

Topping:
1 cup (250 mL) of Robin Hood® all-purpose flour
½ cup (125 mL) of granulated sugar
1 teaspoon (5 mL) of baking powder
½ teaspoon of salt
½ teaspoon of cinnamon
¾ cup (175 mL) of unsalted butter
¼ cup (50 mL) of boiling water

Preheat your oven to 190°C (375°F). Grease a deep 9” round dish. Or if you want to make individual servings like us, eight cocottes (notice our red, green, and white ones - keeping it festive) or ramekins.

To make the filling, pour the dulce de leche over the frozen fruits and mix them together in your dish.

To make the topping, stir together the flour, sugar, baking powder, salt, and cinnamon in a large bowl. Blend in the butter using your fingers until the mixture resembles coarse crumbs.

Stir in the water and mix with a spatula. Scoop out the batter and drop it over the fruit mixture. The topping spreads when it bakes, so don't worry about how neat it looks. If you like, you can sprinkle ⅓ cup of sliced almonds, walnuts, or chopped pecans.

Bake in your preheated oven for about 55-60 minutes or until the topping is golden. You can also insert a toothpick in the centre, if it comes out clean, it's ready!

We like eating these after 15 minutes of cooling. There's something very comforting about eating warm cobbler by the fireplace in the winter.

I like to mix the cobbler up so that I get a bit of everything in each bite. Yum! The cobbler was delicious on its own, but feel free to add a scoop of vanilla ice cream to go with it!

Look! The elusive peach!

Disclaimer: This holiday season, A Baked Creation partnered up with Robin Hood®, who is celebrating the 30th anniversary of their annual Holiday Recipe Collection. They were kind enough to send us a baking package with Robin Hood® all-purpose flour and Eagle Brand® Dulce de Leche caramel flavoured sauce.

Tuesday, December 11, 2012

Snowmen Macarons

This Christmas, instead of going out and buying sweets, I decided to make them for my colleagues. This was the weekend to make them as some of my coworkers start their holiday next week (including myself)!

I knew I wanted to make macarons again, they're quite the hit in our area, we've even celebrated birthdays with macarons instead of cupcakes lately! Now, to look for festive macaron ideas, I browsed a number of blogs before coming across these from Steph at Raspberri Cupcakes (an amazing blog - go check it out). Ridiculously cute, right?

French Meringue Macarons
Recipe from Macarons
(Makes about 48 snowmen macarons)

2 3/4 cups of almond flour
2 3/4 cups of powdered sugar
1 cup of egg whites (from 6-7 eggs)
A pinch of salt
3/4 cups of granulated sugar.
  1. The first step in making successful macarons is to age your egg whites. Yes, we know, this sounds odd, but follow these strict instructions! So separate your egg whites 2-3 days before baking. Store them in the refrigerator - covered. Two hours before you start making your macarons, take the egg whites out of the refrigerator, uncover them, and let them come to room temperature. That's not too difficult! Just keep this in mind during your planning stage.
  2. Next, sift the almond flour and powdered sugar. If you have a food processor, put both ingredients in to create as fine as a texture as possible. This helps create smooth macarons.
  3. Using the whisk attachment on your mixer, whisk the egg whites with the salt. Pour the granulated sugar in three stages. Dumping it all in can deflate the egg whites, so you want to add a little bit at a time. When the egg whites reach stiff peaks, you're done!
  4. Fold the sifted almond flour and sugar with the egg whites. You want to end up with a smooth batter that creates a ribbon when you lift it up from your spatula.
  5. When the batter is ready, fill your piping bag and pipe the body of the snowmen on parchment paper. Then go back and add the head of the snowmen. Carefully tap your tray against the table or counter to eliminate air bubbles.
  6. Add three silver dragées for buttons as the macarons are resting. Let them rest in room temperature for 15-30 minutes.
  7. Preheat the oven to 300°F (325°F for non-convection oven, the cookbook recommends using a convection oven because of the even distribution of heat).
  8. Bake your first tray of macarons for 14 minutes. After the first five minutes, open the oven doors to let out some of the steam.
  9. When they're done, let them cool for 5 minutes and then gently peel the macarons off the parchment paper.
Snowmen with silver buttons and feet!

Phew! Adding the decoration on top of the macaron batter was a first, so I'm glad that worked out!
After the macarons were cooled and rested, I used my handy orange edible ink pen to draw on the carrot noses.

Then, using the black edible ink pen for the eyes and mouth.

Look at them! I filled these bad boys with vanilla pastry cream!

Vanilla Pastry Cream
Recipe from Desserts by Pierre Hermé
(Makes enough to fill each macaron, with leftovers)

2 cups milk
1 vanilla bean, halved and scraped
6 egg yolks
1/2 cup sugar
1/3 cup cornstarch, sifted
3 1/2 tablespoons butter
  1. Flatten the vanilla bean and slice it open with a sharp knife. Peel the bean open and scrape the seeds out with the knife. 
  2. In a small pot, bring the milk with the vanilla bean with scrapings to a boil, set it aside to cool for 10 minutes; remove bean. 
  3. Fill a large bowl with cold water (or ice). 
  4. In a medium sized pan or small pot, whisk the egg yolks, sugar, and cornstarch together. Gradually whisk in the hot milk. 
  5. Place the pan over high heat and bring it to a boil, whisking vigorously for 1 to 2 minutes. Set the bowl in the ice bath or cold water and stir until the temperature reaches 140°F (60°C) on an instant-read thermometer. 
  6. Stir in the butter. Cool, cover, and refrigerate.
Here's the second tray!

Gosh, they're really cute.

I only did a round macaron for the back of the snowmen. I think I should have made the full body for the back too.

Next time!

Here are some happy snowmen frolicking in the snow.

These ones don't look as happy.

Nor do these, a big snowstorm would mean getting covered up!

To package up my snowmen macarons, I went to find cute little take-out boxes. There were so many festive boxes to choose from, but I thought these Santa ones were really eye-catching!

Carefully tucking the macarons in with parchment paper. Everyone gets five! Is five enough?

I had extra snowmen macarons, so I placed them in sandwich bags and twist-tied them. It wasn't difficult to find homes for these ones in the office.

Disclaimer: This year, A Baked Creation is partnering up with Robin Hood®, who is celebrating the 30th anniversary of their annual Holiday Recipe Collection. They were kind enough to send us a baking package and it included the silver dragées!

So glad we could put them to good use already! Here's to the first of many baking memories this season!