WE'VE MOVED

Hello!

Thank you for the amazing 8 years here at A Baked Creation, we can't thank you enough for the memories! But we've decided to move over to a new site - Sincerely, Syl. Please join us there for future posts on all the things you loved here!

Sincerely,
Syl
Showing posts with label cookie. Show all posts

Sunday, August 16, 2015

Smiling

Sometimes other people know best.

This was one of those situations where I was pretty adamant that I did not want a bridal shower or bachelorette party. I was serious and stayed strong. But then finally gave in after they asked me for the fiftieth time. Fine! Do it, whatever you want! No one listens to the bride anyways!

I caved and agreed to a small bridal shower (still a big no to the bachelorette party) and to my maid of honour's delight, she got to plan a tea party for me.
You know what? My bridal party has got skills. And game. They completely blew me away. Prior to the party, the only thing I did was give them a list of all the ladies invited to the wedding. Threw in a few activity ideas. And that was that. They did everything else. So I went in not knowing what to expect . . .
But look at the spread! These were all homemade! Unbelievable as they look store bought, but my maid of honour made lots and lots of tea sandwiches. One of my bridesmaids made three different types of scones: lemon poppyseed, berry, and a chocolate chip one. The other bridesmaid made a cherry crumble and blueberry crumble.
My bridesmaids are busy people. Always on the go and taking care of their energetic kids. So I was so touched that they squeezed in some baking time for me. And they didn't just make one flavour, they had to go for the gold star and make a variety!
Then there was the decoration. Silver, white, and pink balloons to match what their bouquets will be on the wedding day. Black and white HOWIA sign to match our classic wedding theme - also homemade. At first glance, I thought they bought the letters from a craft store!
Throw in my favourite colour of teal, a pretty table runner, mason jar centerpieces, and a cheese platter, this tea party had me speechless. My mom and future mother-in-law also pitched in a brought lots of food and desserts. A few aunts and friends couldn't make it, but we still had a great time playing games and catching up.
There was even a designated seat for me. I was scolded many times to stay under the Bride-To-Be bunting (also homemade by my bridesmaid). Look at how cute those paper ribbons are! Seriously Pinterest worthy!
We were pretty full from lunch, but you can't have a bridal shower for a dessert lover without dessert! There were lots of cakes and cookies and squares to be eaten and shared. Look, even teapot shaped cookies!
We obviously don't believe in sugar overload.
Or portion control. We will just eat and eat and eat. I do feel that I'm eating a lot more desserts these days - it's what all brides do a month before their wedding, right?

Also, we had yellow watermelon. And coconut lime sparkling beverages. And I ate sugar snap peas (I absolutely hate peas, especially those in the frozen medley with carrots).
Doing what I do best, cutting into a delicious chocolate cake. (For those of you who haven't seen me in contacts, I am not cutting the cake blind. I do occasionally wear them! And also for those of you who haven't seen me with wavy hair, I did attempt to curl them, but my hair likes to go back to being pin straight after awhile.)

Why the heck am I even having my wedding at a restaurant? My bridal party could totally cater.
Oh and those cute milk carton party favours? Another amazing DIY project by one of my bridesmaids. The were all personalized boxes of tea so that guests could take home a memento of the tea party.
Yup, the tags and labels were all personalized "S"ylvia tea!!!

I think everyone left smiling and I couldn't thank my friends more. They did so much to make the afternoon special for me. Hugs and thank you to Megan, Diana, and Laura!!! I am so excited for the big day because they'll be there to support me. =)

Tuesday, April 21, 2015

Basic, Great Chocolate Chip Cookies

There has been so many great new cookbook releases this spring, I can barely keep up! What's wonderful about these titles are the quality of material coming from Canadian authors: Sara Britton of My New Roots, Rosie Alyea of Sweetapolita, and Tara O'Brady of Seven Spoons. I meant to do a post for each book as they released, but the weekends just seem to fly by (why aren't weekends three days instead of two?).

But I had three beautiful bars of chocolate, the cookbook, and Tara's post to get me off my butt to make something. Plus, who can resist basic, great chocolate chip cookies?
Look how beautiful the tasting bars are! I've never used Valrhona chocolates before, but I've heard about their excellent reputation. Plus, they're always getting mentions in cookbooks where chefs repeat: use quality products. Really, I felt like Charlie from the Chocolate Factory when I ripped off the gold foil and saw the gorgeous design on these bars.
I felt like I was destroying art chopping up the chocolate bars. But at least they had a guideline of grids on it. You can chop them up a bit smaller, but I wanted to be able to taste each different chocolate piece in the cookie.
Do you like the sweet and salty combination? I found that the little sprinkle of sea salt on top was strong, so don't go overboard! Just put less than a pinch on top of the batter.

Basic, Great Chocolate Chip Cookies
Recipe adapted from Seven Spoons by Tara O'Brady
(Makes about 24 cookies)

1 cup of unsalted butter
3 1/4 cups of all-purpose flour
1 1/4 teaspoons of baking powder
1 teaspoon of baking soda
1 1/2 teaspoon of salt
1 1/2 cup of brown sugar
1/2 cup of granulated sugar
2 eggs
2 teaspoons of vanilla extract
210 grams of chopped chocolate (Tara calls for 340 grams of semisweet or bittersweet chocolate)
Flaky sea salt (optional)
  1. Preheat your oven to 360°F (180°C) - don't forget to check with an oven thermometer. Line two baking sheets with parchment paper.
  2. Place the butter in a saucepan and melt on the lowest setting. You want the butter to melt, but not sizzle and lose moisture.
  3. Take a chef knife and chop up your chocolate. I used three 70 gram bars of 32% cacao, 46% cacao, and 72% cacao. I combined all three together so that the cookies would get a mix of blond, milk, and dark chocolate bits in it.
  4. In a bowl, whisk the flour, baking powder, baking soda, and salt.
  5. Using a stand mixer, pour in both sugars and the melted butter. Whisk until combined. Add in the eggs one at a time. Pour in the vanilla extract. Once it's blended, switch the whisk attachment to the paddle or use a spatula.
  6. Carefully add in the dry ingredients and mix a little bit (doesn't have to be well blended at this point).
  7. Add in the chopped chocolate and fold into the batter until well combined. The less mixing you do when the dry ingredients are added, the better. You don't want the batter to become too doughy and smooth.
  8. At this stage, you can refrigerate the batter. I did for 5 minutes because the batter was looking a bit shiny and it is mentioned in Tara's notes - thanks for troubleshooting!
  9. Scoop out about 3 tablespoons of batter and form it into a ball. Place on parchment paper and space each one 3 inches apart. Optional, sprinkle the top with flaky sea salt. I did for 12 and left the other 12 as is.
  10. Bake for 10 to 12 minutes. When you take them out, let them rest for 2 minutes before transferring to a wire rack to cool.
I love how quickly the cookie batter came together, there's no need to chill the dough for hours or overnight. All about the immediate gratification here.
Unbelievable. Just because I'm standing on a chair taking cookie photos, it doesn't mean someone should swoop in and grab one. Luckily, I caught the thief red-handed in the photo and was able to confront them later.
Oh these cookies are good. They're soft and chewy on the inside. And yes, they're cookies worth dreaming about and craving for. They would make a great base for nutty cookies too (walnuts or pecans anyone?).
Happy publication day Tara!

Sunday, January 11, 2015

Caramel Stuffed Snickerdoodles

Happy new year! We hope you all had a wonderful holiday and that the start of 2015 has been a joy as well. Our new year's eve plans consisted of being around great friends, Chinese food takeout, board games, and a cookie exchange. There were delicious caramel and chocolate chip cookies as well as an oatmeal, chocolate, and Skor cookie. We contributed a caramel stuffed snickerdoodles - the name having many confused. Where are the Snickers? What makes them doodles? I had no idea, but a chewy cookie is my favourite kind of cookie.
Caramel Stuffed Snickerdoodles
(Makes about 4 dozen cookies)

2 3/4 cups of all-purpose flour
2 teaspoons of baking powder
1 teaspoon of baking soda
1/4 teaspoon of salt
2 sticks of unsalted butter, at room temperature
1 3/4 cups of granulated sugar
2 tablespoons ground cinnamon
2 large eggs
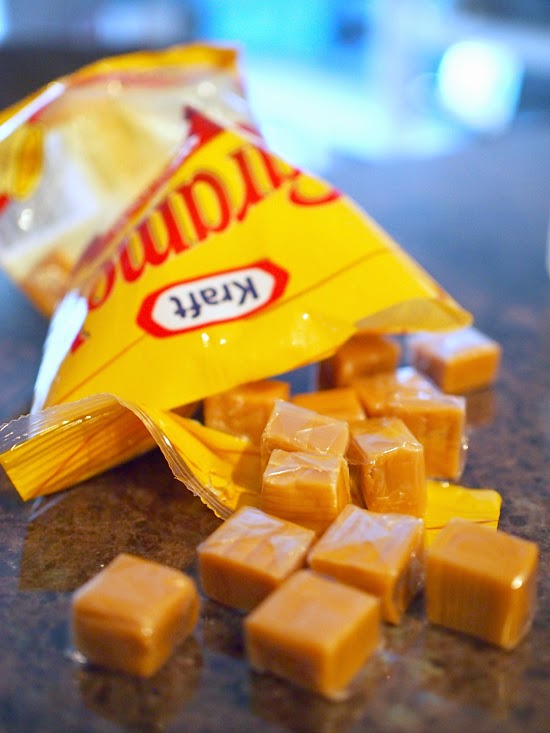
48 caramels
  1. Sift together the flour, baking powder, baking soda, and salt; set aside. 
  2. In the bowl of an electric mixer fitted with a paddle attachment, beat the butter and 1 1/2 cups of sugar on medium speed until light and fluffy (about 2 minutes)
  3. Add the eggs and beat to combine. Carefully pour in the dry ingredients and beat until mixture is well combined
  4. Take out plastic wrap and wrap the dough. Chill overnight (or one to two hours if you're in a hurry).
  5. Preheat the oven to 400°. Line your baking trays with parchment paper or a silicone baking mat.
  6. In a small bowl, combine the remaining 1/4 cup of sugar with the ground cinnamon.
  7. Use a tablespoon to scoop the dough. Roll into a ball and then flatten to form a disc. Take another scoop of dough and roll into a disc shape. Place a caramel in between the two discs of dough, like a sandwich! Gently fold the edges over so that that top and bottom dough meet. Roll to seal, make sure none of the caramel is sticking out. It should be encased in the middle.
  8. Roll the ball of dough in cinnamon sugar. Place on parchment paper (or silicone mat) on a baking tray. Cookies should be placed two inches apart because they will spread!
  9. Bake for 10 minutes, there might be some minimal cracking on the top of the cookies, but that's' okay!
  10. Immediately transfer to a wire rack to cool, you don't want the cookies to over bake.
Find caramel squares if possible, they're the perfect size!
Leftover cinnamon sugar is great on peanut butter toast with slices of banana.
Don't forget to give the cookies space to spread in the oven!
I love how these turned out. Little soft puffs. Like cinnamon sugar clouds.
And then there was the gooey, melting caramel in the center . . . good luck just eating one!
Snickerdoodles all packed up and ready for the cookie exchange!

Friday, December 26, 2014

Skillet Cookie

Happy holidays everyone! We hope you had a great time and totally chilled this boxing day. I'm happy to say we haven't stepped out of the house yet to venture into the crowds. It's nice when there isn't really anything on your immediate shopping list. That's not to say that we don't have items on our wishlist, but nothing is urgent enough to warrant an early wake up to line up at the stores.

We spent Christmas eve and Christmas days with our family. Both of our parents hosted and made hot pot for dinner. Mmm: tofu, mushrooms, radishes, meatballs, fish, scallops, shrimp, and finely sliced pieces of meat.

This morning I made nachos with my favourite guacamole: avocados, tomatoes, shallots, garlic, cilantro, lime juice, salt, and pepper. Tossed in some pomegranate seeds since I was feeling festive. Then a Dutch baby with sautéed apples. It failed. I've made this three times this year, twice it stayed flat and refused to puff up and give me the air pockets I desired. Once (when I actually had guests over) it did and was beautiful and impressive to my brunch crowd. Seriously, I stress over Dutch babies more than soufflés. How is that right? Why does the Dutch baby make me cry?

Well, at least this skillet cookie does not disappoint.
Skillet Cookie
(Makes six 5-inch skillet cookies or two 9-inch skillet cookies)

1 1/2 stick of unsalted butter
1 cup of semisweet chocolate chips
1 cup of granulated sugar
2 large eggs
1 cup of all-purpose flour
1/2 cup of cocoa powder
  1. Preheat the oven to 325°F (160°C).
  2. In a microwave-safe bowl, place butter and chocolate in it, then melt on low power for 1-2 minutes.
  3. Whisk in sugar until smooth. Let it cool, if you don't the eggs will cook too fast when you put them in.
  4. Whisk in the eggs until combined.
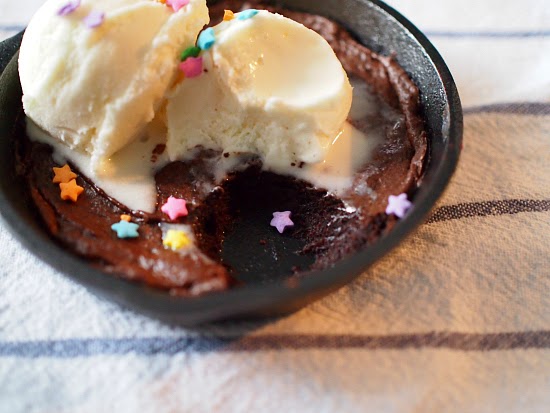
  5. Add in the flour and cocoa powder. The mixture will be very dark, thick, and shiny (see the first photo).
  6. Scoop and place into skillet, about half full. Bake for 10-12 minutes or until the batter loses the shininess.
  7. Cool for a few minutes and top with ice cream and sprinkles!
Don't over bake these, you want them to be soft and gooey. They're best when they're still warm. If you don't have enough skillets (who does?? Why would any of us own that many mini skillets?), you can use a small ice cream scoop to divide the batter and drop onto parchment paper as drop cookies.

Saturday, September 6, 2014

Carlo's Bake Shop

3325 S. Las Vegas Blvd
Las Vegas, NV, 89109
(702) 607-2356

You know I don't go anywhere without at least visiting some bakeries! Since we never make the trek over to Hoboken to visit the original shop during our New York City trips, we decided to visit their newly opened Vegas location.
Not surprising, there was a lineup. But there's a viewing gallery into the bakery's workspace to help you pass the time.

Beach cakes being decorated . . .
Fresh pastries from the oven . . .
Vegas themed cake being worked on . . .
Once you reach the front of the line, someone at the counter waves you over to enter the bakery.
Once there, you can stare at all the different dessert choices available.
And there's a lot of choices.
I didn't even know what to order as I was racking my brain to remember what they're best known for.
Was it their cookies?
The cupcakes?
Once Howard and I were ready, we placed our order with someone behind the counter. They write everything down and then you proceed to the waiting area as they pack everything up.
I went with one of the cupcakes!
When your order is ready, you get called over to the cashier to pay. I have to say, they have their crowd control figured out.
The box was tied up so nicely that we opened it back in our hotel room. We got two giant cookies, two small butter cookies, my cupcake, and a Danish for breakfast the next day. I wasn't a fan of the butter cookies, but I enjoyed my giant M&M cookie. The peanut butter cookie was good too. The cupcake was okay, probably because I was expecting spectacular from all the press and fame from this empire. Let's just say, I'm glad we don't make the extra trip to Hoboken when we're in New York.

Saturday, July 5, 2014

No-Bake Mini Cheesecake Blossoms

Beauty! These no-bake mini cheesecake blossoms were so fun to make, mainly because I love desserts that feature some kind of floral decoration. What can I say? I love it when I get flowers!

Now, I've made my fair amount of cheesecakes before, and always found it agonizing when you place it in the oven and cross your fingers that it bakes evenly. Nobody wants cracks to show up on the surface of a perfectly smooth cheesecake. And there's the bain marie (or water bath) that you have to deal with. So if you're on the lookout for a no-bake recipe, this is one to try.

No-Bake Mini Cheesecake Blossoms
Shopping List: cream cheese, sweetened condense milk, icing sugar, vanilla extract, unflavoured gelatin, chocolate sandwich cookies, and fruit.

Let the cream cheese rest in room temperature for about an hour or so. Letting it soften up helps the mixing process a lot!

This is pretty simple and having a stand mixer makes it even easier. You throw in the cream cheese, sweetened condense milk, icing sugar, and vanilla extract and beat it until it's smooth.

In a small bowl, you mix the gelatin with boiling water and stir until it dissolves. Then add the gelatin into the cream cheese mixture.
Fill a piping bag with the batter and pipe cream cheese to cover the bottom of the mini cupcake liners or mini dessert jars. A good friend of ours bought me a set of mini dessert jars for my birthday and I was pretty excited to use them. The glasses are about two inches tall and I was able to fill nine of them. The recipe yields about 24 for mini cupcake liners.
Place one cookie (I used regular sized chocolate sandwich cookies, but use the mini versions if you're going with mini cupcake liners) in each and press it down so that some of the batter comes up on the sides. Pipe on the remaining cheesecake batter to cover the cookies.

Refrigerate for at least three hours or overnight.
I'm deviating a bit here, so if you're up for mango blossoms, read on. If you want other blossom ideas, watch this video to see how easy it is to decorate your cheesecakes with fruit.

Remove the skin from the ripe mango and slice all four sides around the mango seed. Next, lay the pieces down thinly slice them so you have many semi-circle pieces. Picking the right mango is crucial as you don't want one that is too firm because it won't bend and might break, and you don't want one that is too ripe for it'll become mushy if you try to curve it.
To create the blossom, take one of the shorter slices of mango and curl it up to form the middle of the bud. Place it in the middle of the cheesecake. Then, take medium slices and wrap it around. You want the curve side facing up and the straight edge on the cheesecake. Keep surrounding the middle piece with mango slices until you reach the edge of your bowl or cupcake liner.
You can probably work the opposite way and go outside in if that's easier. You also don't have to place the bud in the middle! Even if you start on the side, just keeping adding mango slices for a lovely layered look.
You can garnish your cheesecakes with whatever you like, maybe you know some chocolate fans, add some chocolate crisps or chop up your favourite candy. Drizzle on caramel sauce. Add dollops of jam and cream. But guys? Blossoms are pretty and impressive. ;)

Share your no-bake mini cheesecake blossom snapshots with @canadianliving on Twitter, Facebook, and Instagram with the hashtag #CLIMadeIt.

Disclaimer: This is a sponsored post by Canadian Living and I received compensation for it. There was no requirement to produce a positive review of this recipe. All opinions are our own.