Whether we like it or not, autumn is here. Chilly nights, jackets, leggings, and boots. Time to add on the layers when you step outside. Don't forget to boost your immune system, it's also the time of year you're most likely to catch a cold. I know I did, but I'm thankful that my sick days were kept to a minimum.
With September almost over, it's time to think of the lovely fall harvest. Soups and comfort food is on everyone's radar and don't forget that Thanksgiving is October 13 this year!
When I saw this month's cover, I panicked a little bit. Turkey? Such a huge undertaking! I've never roasted a turkey before! Aren't they tricky? What's the best way to fully cook the bird and not dry it out? I almost decided to skip this challenge, but then when would I ever get around to my first turkey attempt? What better way could there be than to have other bloggers go through the same cooking experience? Let's do it!
Lemon and Thyme Roast Turkey With White Wine Gravy
Shopping List: turkey, fresh thyme, garlic, dry white wine, sodium-reduced chicken broth, all-purpose flour, butter, lemon zest, salt, and pepper.
The shopping list was fairly easy. Most people already have garlic, wine, chicken broth, flour, butter, and your staples: salt and pepper in the kitchen. We only had to go find the turkey, thyme, and pick up a lemon. The short grocery list was another reason that I wanted to try this recipe. It's fairly straightforward and simple. No stuffing or bed of vegetables to tackle.
First up, make the lemon and thyme butter: In a bowl, melt the butter (a few seconds in the microwave), stir in the thyme, lemon zest, salt, and pepper.
Next, remove the giblets and neck from turkey; place the neck in roasting pan. Fill the turkey's cavity with thyme and garlic (ahhh I placed my hand in there!!). Place the turkey on a rack in the roasting pan (thank goodness the turkey fit). That lemon and thyme butter? Brush it all over the turkey.
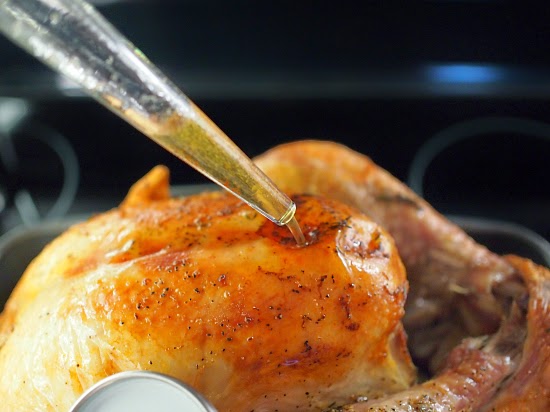
Roast in 325°F (160°C) oven, basting every 45 minutes. To baste, take the pan out. Using oven mitts, tip all the juices to a corner and gather with baster. Pour the juices over the turkey to keep it from drying out.
The turkey is ready when the thermometer inserted in thickest part of breast reads 170°F (77°C). This takes about three and a half hours.
Isn't it beautiful?? That lovely golden skin and my home smelled soooo good!
Take the turkey out and gently tip to pour juices from the cavity into the roasting pan. Transfer turkey to carving board and cover loosely with foil. Let it rest for half an hour.
To make the gravy, discard the turkey neck from the pan. In a small pot, bring wine to a boil over medium-high heat. Whisk the turkey's juices with the broth and flour until smooth. Pour the wine into the roasting pan. Place the roasting pan on the stove and bring to a boil. Keep whisking as it'll thicken fairly quickly. Another first for me, making gravy from scratch!
Howard had the honours of carving the turkey (sneaking in bites now and then) and we set out sides for everyone to help themselves - buffet style. Mixed green salad, hasselback potatoes, stuffing, and cauliflower-broccoli gratin. The turkey and gravy still the star of the meal. The skin was delicious and we even ended up pouring the light gravy over the salad, stuffing, potatoes ...
I'm sure there are no-muss and no-fuss turkey recipes out there with no basting. But I think this is still a pretty easy and minimal prep recipe, plus the results were stellar. Give it a try if it's your first turkey! I would recommend having two timers on hand, one for every 45 minutes and one for the total cooking time. And the most important tool was the leave-in meat thermometer for peace of mind, you wouldn't want to carve the turkey and pop it back in the oven after finding it still cold!
Disclaimer: This is a sponsored post by Canadian Living and I received compensation for it. There was no requirement to produce a positive review of this recipe. All opinions are our own.
WE'VE MOVED
Hello!
Thank you for the amazing 8 years here at A Baked Creation, we can't thank you enough for the memories! But we've decided to move over to a new site - Sincerely, Syl. Please join us there for future posts on all the things you loved here!
Thank you for the amazing 8 years here at A Baked Creation, we can't thank you enough for the memories! But we've decided to move over to a new site - Sincerely, Syl. Please join us there for future posts on all the things you loved here!
Sincerely,
Syl
Friday, September 26, 2014
Thursday, September 25, 2014
Merguez Sausages

I'm so excited to share my first homemade sausage experience with you. That's right, first time and I think I pretty much aced it! Although, the success has to be shared as I enlisted some experienced sausage makers – Howard's parents – to chaperone and make sure I was on the right track.
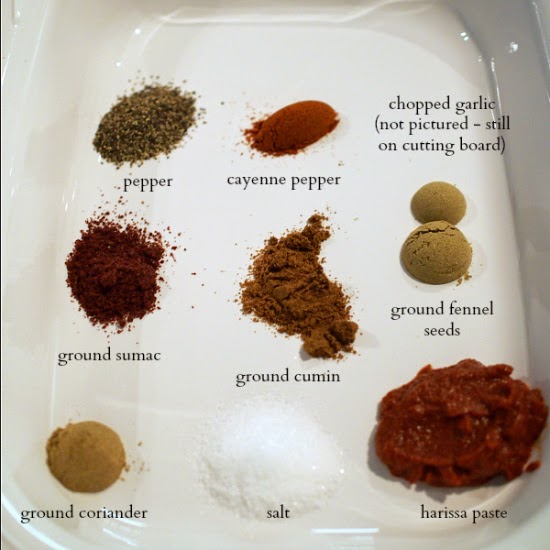
First thing, read the recipe and head out to the grocery store to pick up some ingredients: boneless lamb shoulder, garlic, harissa paste, ground fennel seeds, ground coriander, ground cumin, ground sumac, ground cayenne pepper, and sausage casings.
Using a large container (preferably with lid) for marinating, stir together the chopped up lamb, garlic, harissa paste, salt, ground fennel, ground coriander, ground cumin, ground sumac, pepper, and cayenne pepper. Cover and refrigerate overnight.
This is where it gets exciting (because I've never done it before). Using the Multi Food Grinder attachment on my Kenwood Chef Kitchen Machine, fitted with the coarse screen, we did a first pass with the lamb mixture. This will make the second pass through much easier.
At this point, rinse the casing and soak it in cold water.
Next up, we attached the multi food grinder attachment with the medium screen and added 1/2 cup of ice water to keep the lamb mixture moist. Look! It looks like the ground meat you find at supermarkets! Success!
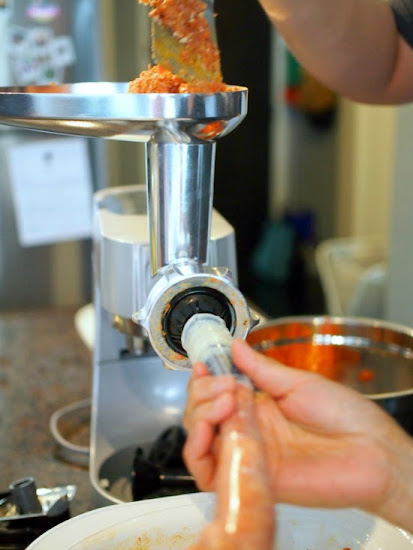
Okay, final pass. This time we loaded the large nozzle attachment and fitted the sausage casing over it. This was the point in the process where I was a bit nervous. What if we couldn't keep up with all the meat loading into the casing? But luckily, with the motor control on the Chef, we could set it to a low speed and carefully take our time to make sure the casings were filled properly.
Make sure you have a helping hand at this point; you'll need someone to push the meat and someone to hold onto the casing. Teamwork!
Once the casing is stuffed with lamb mixture, twist into 5-inch (12 cm) links. Refrigerate until you're ready to cook.
Hungry? Place the sausages on a greased grill over medium heat and close the lid. Grill, turning once, until browned and juices run clear when sausage is pierced. Cut the links, the sausages will hold to finish.
These sausages are good! They have a great amount of spice and flavor, the consistency of the meat was good too. Everyone was raving about them and incredibly impressed that they were homemade. We polished off all 10 links that night!
Disclaimer: This is a sponsored post by Canadian Living and Kenwood. I received compensation for it. There was no requirement to produce a positive review of this recipe. All opinions are our own.
Monday, September 8, 2014
Sprinkles
The LINQ
3545 South Las Vegas Boulevard
Las Vegas, NV 89109
(702) 733-0522
I could jump for joy, I love Sprinkles! I love the design of their stores, I love the look of their products and packaging, I love how delicious their treats are! We made multiple trips back to Sprinkles during our stay in Vegas.
Everything tends to look better at night in Vegas - sparkly lights!
The famous cupcake ATM!!! We saw many people use it with such happiness and excitement when the cupcake was dispensed. I wanted to try, but it only takes credit card and I didn't want to pay for the exchange rate.
But it doesn't matter. You can get the same cupcakes in store! But we were here for their frozen treats.
I spy waffle cones and red velvet waffle cones!
If you order a Sprinkles sundae, you get a scoop of ice cream between a cupcake bottom and top. If your order a Sprinkles sandwich, you get a scoop of ice cream between two cupcake tops!
You can also get cookie sundaes, or a cookie sandwich with a scoop of ice cream in between.
We tried their yummy caramelized Cap'n Crunch ice cream which is what it sounds like, Cap'n crunch cereal sprinkled into milky Cap'n Crunch flavoured ice cream. And the strawberry ice cream, sometimes when the heat is too much, I default to fruits instead of chocolate or overly sweet desserts.
And our favourite, the blood orange sorbet, which is a dairy-free citrus sorbet flavored by zesty blood oranges. Perfectly refreshing!
Sunday, September 7, 2014
Payard Patisserie and Bistro
Caesars Palace Hotel
3570 Las Vegas Boulevard South
Las Vegas, NV 89109
(702) 731-7849
Even though we've been to many Payard locations, we couldn't help taking a look at what the display cases offered.
Each piece of dessert looks like a work of art!
Let's just say we made plenty of visit to Payard during our stay in Vegas.
Hot days call for mango and raspberry gelato. And smoothies.
And my favourite one of all, the macaron ice cream sandwich!
Isn't the box cute?
The coconut mango was so good and refreshing. The macaron shells were the perfect texture and held the frozen treat nicely. I was worried the macaron might be too soggy or too crisp and crumb away, but it wasn't. This is a treat I'll crave every summer, luckily they serve it in New York as well!
Saturday, September 6, 2014
Carlo's Bake Shop
3325 S. Las Vegas Blvd
Las Vegas, NV, 89109
(702) 607-2356
You know I don't go anywhere without at least visiting some bakeries! Since we never make the trek over to Hoboken to visit the original shop during our New York City trips, we decided to visit their newly opened Vegas location.
Not surprising, there was a lineup. But there's a viewing gallery into the bakery's workspace to help you pass the time.
Beach cakes being decorated . . .
Fresh pastries from the oven . . .
Vegas themed cake being worked on . . .
Once you reach the front of the line, someone at the counter waves you over to enter the bakery.
Once there, you can stare at all the different dessert choices available.
And there's a lot of choices.
I didn't even know what to order as I was racking my brain to remember what they're best known for.
Was it their cookies?
The cupcakes?
Once Howard and I were ready, we placed our order with someone behind the counter. They write everything down and then you proceed to the waiting area as they pack everything up.
I went with one of the cupcakes!
When your order is ready, you get called over to the cashier to pay. I have to say, they have their crowd control figured out.
The box was tied up so nicely that we opened it back in our hotel room. We got two giant cookies, two small butter cookies, my cupcake, and a Danish for breakfast the next day. I wasn't a fan of the butter cookies, but I enjoyed my giant M&M cookie. The peanut butter cookie was good too. The cupcake was okay, probably because I was expecting spectacular from all the press and fame from this empire. Let's just say, I'm glad we don't make the extra trip to Hoboken when we're in New York.
Wednesday, September 3, 2014
Wordless Wednesday: September 3, 2014
Subscribe to:
Comments (Atom)


