This recipe caught my attention in Curtis Stone's Good Food, Good Life because one - I had all the ingredients on hand and two - I never made falafels before. He notes that falafels are traditionally made with uncooked chickpeas that have been soaked overnight, just until they're partially softened. That's how you get the crunchy texture. But by using canned chickpeas and almonds you can achieve a similar crunch and make falafels on the same day.
Almond Falafel
Recipe from Good Food, Good Life
(Makes about 35-40 falafels)
1/2 onion, chopped
4 garlic cloves
1 tablespoon of ground coriander
1 1/2 teaspoons of ground cumin
1 1/2 teaspoons of salt
1/2 teaspoon of cayenne pepper
2/3 cups of fresh parsley leaves
1/2 cup of fresh cilantro leaves
1 cup of raw whole almonds
2 cups of canned chickpeas
1/3 cup of all-purpose flour
2 tablespoons of toasted sesame seeds
1 1/2 teaspoons of baking powder
Canola oil for deep frying
Have everything out and ready, rinsed and cleaned (canned chickpeas, parsley, and cilantro leaves). Even though it took me a long time to make the first time around, now that I've made it once, it really is quick and easy!
Throw the onion, garlic, ground coriander, ground cumin, salt, cayenne pepper, parsley leaves, cilantro leaves, almonds, and chickpeas into your food processor and pulse until everything is combined. Oh my bejebus, this mixture smells so good in the food processor!
Mix in the flour, sesame seeds, and baking powder. Set up your deep frying station, turn the heat on and as you wait for the oil to reach 350°F, form the falafel mixture into balls with your hands (about 1 and 1/2 tablespoon).
Use tongs or a slotted spoon to gently lower the falafels into the oil to deep fry. I was able to fit six in without the temperature dropping. Keep an eye on your thermometer and fry for 3 to 4 minutes.
They're ready when they're golden brown. Take them out and place on paper towel over a cooling rack. Season with salt.
Tahini Sauce
Recipe from Good Food, Good Life
(Makes about 1 1/3 cups)
1 garlic glove
1/2 cup tahini paste
1/4 cup of fresh cilantro leaves
1/4 cup of fresh parsley leaves
1/4 cup of lemon juice
1/2 cup of cold water
Salt and Pepper to taste
Blend everything in a food processor or mixer! That was easy.
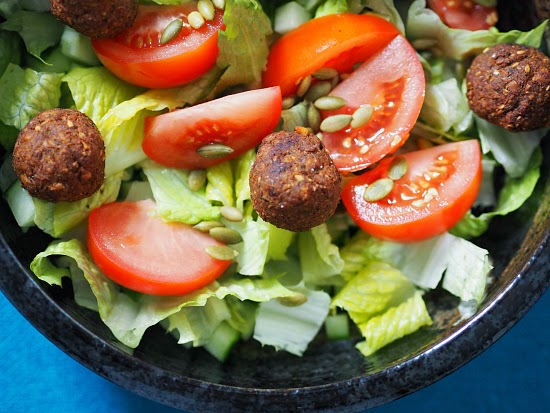
Serve with pitas or tortillas, cabbage or lettuce, tomatoes, cucumbers, and shallots (or if you prefer onions). Make sure you spread in the tahini sauce.
Delicious! I loved pulling the falafel open to see the green colour and heat rise out. Leftovers can be kept in the fridge and warmed up when it's time to eat again. I've only had falafels twice in my life. Once here in Toronto and once in New York City. I think I like these homemade versions better. =)
Best of all, they're really filling and Howard didn't even mind that we were having a meatless dinner!
WE'VE MOVED
Hello!
Thank you for the amazing 8 years here at A Baked Creation, we can't thank you enough for the memories! But we've decided to move over to a new site - Sincerely, Syl. Please join us there for future posts on all the things you loved here!
Sincerely,
Syl
Showing posts with label almond. Show all posts
Wednesday, March 11, 2015
Friday, June 13, 2014
Cook the Cover: Canadian Living July 2014
You don't even know how excited I was to see this cover recipe!
Grilled peach? It's one of our favourite summertime desserts, made popular last year when we repeatedly had grilled pound cake with grilled peaches and vanilla ice cream. There's something wonderful in seeing grilled marks on fruits and vegetables, something different from the usual meat selection.
This sundae is pretty easy to make and the raspberry sauce can be made ahead of time so that when you're ready to eat, all you have to do is grill the peaches and scoop the ice cream. Almond slivers can be optional, but they provide a nice crunchy texture if you have the time to give them a quick toss in the oven.
Grilled Peach Melba Sundae
Shopping List: unsalted butter, brown sugar, peaches, vanilla ice cream, raspberries, sliced almonds, granulated sugar, lemons, and cornstarch.
I love summer for the abundance of fruits!
Here's me showing you that a scale is the best thing you can invest in when you're following recipes. It works so much better. For the sauce, I have a cup of raspberries there and showing you what 250 ml of raspberries look like. There's a huge difference!
The raspberry sundae sauce is super easy, just throw in the raspberries, sugar, lemon juice, and 1 tbsp water in a blender. Strain the sauce through a sieve into a saucepan (discard seeds). Cook the sauce over medium heat, stirring, for about 2 minutes until it is warmed through.
Whisk the cornstarch with 1 tbsp water and then stir it into raspberry mixture. Bring the sauce to a boil, keep stirring until it thickens, about 1 minute. Transfer to bowl (or jar in my case) and cover and refrigerate to cool completely, about 40 minutes. You can even make this sauce a week in advance and leave it in the fridge until you need it.
Remove the skin from the peaches and cut them into wedges. Mix softened butter with brown sugar.
Heat the grill pan over medium heat (or if you have a barbecue, use that) and place wedges on to get the charred markings. Turn over to do the same. Near the end, brush the butter and brown sugar mixture on and flip once. You have to watch carefully as it caramelizes very quickly. Remove from the grill and let it cool.
Serve with ice cream, raspberry sauce, raspberries, and toasted almond slivers.
Yes?
Yes to grilled peaches.
Yes to raspberries.
If you've never grilled fruits before.
Do it.
If you've never grilled peaches before.
I highly recommend that you do it.
There's just a wonderful mix of flavour and aroma when a peach is getting its grill marks on. Come on, there's no excuse, this is an easy sundae to make and a sure crowd-pleaser. I don't know how else I should convince you!
See what other bloggers thought about the recipe here.
Disclaimer: This is a sponsored post by Canadian Living and I received compensation for it. There was no requirement to produce a positive review of this recipe. All opinions are our own.
Sunday, October 13, 2013
Cranberry Almond Biscotti
This year, my aunt was hosting Thanksgiving dinner at her house. She was doing all the heavy lifting with the turkey, gravy, potatoes, vegetables, and various other side dishes. The least my mom and I could do was to bring over some cranberry almond biscotti for the coffee and tea portion after dinner. I know, it just doesn't sound fair!
We made one batch of biscotti with Robin Hood's All-Purpose flour and the other using the Omega-3 & Fibre flour blend.
The Omega-3 & Fibre is an all purpose flour blend made from whole wheat flour and flax seeds. We're just trying to insert some goodness after the heavy Thanksgiving meal!
Aside from what the flours are composed of, the most obvious difference between the two flours is the colour. You get white with All-Purpose and a light brown or beige with the Omega-3 & Fibre.
Cranberry Almond Biscotti
Makes about 18-20 biscotti
3/4 cups of almonds
1/2 cup of unsalted butter at room temperature
3/4 cup of granulated sugar
2 large eggs
2 cups of All-Purpose flour or Omega-3 & Fibre flour
1 1/2 teaspoons of baking powder
1/4 teaspoon of salt
1 cup of cranberries
1 large egg
2 tablespoons of water
The photos above depicts the biscotti that used the All-Purpose flour, notice the lighter colour. The photo below shows the Omega-3 & Fibre biscotti in a darker colour tone. The flavours are also noticeably different, but I liked it! Mom didn't, claiming that she detected bitterness and found it more difficult to work with as the dough was stickier. I rather enjoyed the taste (not bitter to me, in fact, it tasted sweeter) of the biscotti made with the Omega-3 & Fibre, but maybe it's because I liked thinking that I was eating something healthy!
Disclaimer: The new Robin Hood Nutri Flour Blend varieties were sent to us for review. All opinions are our own.
We made one batch of biscotti with Robin Hood's All-Purpose flour and the other using the Omega-3 & Fibre flour blend.
The Omega-3 & Fibre is an all purpose flour blend made from whole wheat flour and flax seeds. We're just trying to insert some goodness after the heavy Thanksgiving meal!
Aside from what the flours are composed of, the most obvious difference between the two flours is the colour. You get white with All-Purpose and a light brown or beige with the Omega-3 & Fibre.
Cranberry Almond Biscotti
Makes about 18-20 biscotti
3/4 cups of almonds
1/2 cup of unsalted butter at room temperature
3/4 cup of granulated sugar
2 large eggs
2 cups of All-Purpose flour or Omega-3 & Fibre flour
1 1/2 teaspoons of baking powder
1/4 teaspoon of salt
1 cup of cranberries
1 large egg
2 tablespoons of water
- Preheat your oven to 175°C (350°F).
- Place the almonds on a baking sheet and bake in the preheating oven for about 10 minutes or until lightly toasted. Flip at the 5 minute mark to evenly toast the other side of the almonds. Remove from the oven and cool.
- Using a mixer, cream the butter and sugar on medium until it is light and fluffy. Add the eggs one at a time and mix briefly.
- Add in the flour, baking powder, and salt and mix on low until combined. Add in the cranberries and give it a short mix (less than a minute).
- Using a spatula, mix in the almonds until it is evenly distributed into the batter.
- Divide the dough in two and place it on a silicone mat or parchment paper over a cookie sheet. Shape the dough into a log about 3 inches wide and 10 inches long.
- Whisk the one egg with the water and use a pastry brush to coat the top and sides of the logs with the egg wash.
- Bake in the oven for 20-25 minutes or until the top is firm. Remove from the oven and carefully flip the biscotti over and place it back in the oven for another 10-15 minutes.
- Remove from the oven and let it cool.
- Carefully transfer the logs to a cutting board and using a serrated knife, cut the log into even slices.
The photos above depicts the biscotti that used the All-Purpose flour, notice the lighter colour. The photo below shows the Omega-3 & Fibre biscotti in a darker colour tone. The flavours are also noticeably different, but I liked it! Mom didn't, claiming that she detected bitterness and found it more difficult to work with as the dough was stickier. I rather enjoyed the taste (not bitter to me, in fact, it tasted sweeter) of the biscotti made with the Omega-3 & Fibre, but maybe it's because I liked thinking that I was eating something healthy!
Disclaimer: The new Robin Hood Nutri Flour Blend varieties were sent to us for review. All opinions are our own.
Sunday, August 18, 2013
5 Years
It has been five great years of baking, eating, and blogging! We want to thank each and every one of you for visiting our blog. We hope you're enjoying our culinary journey and we love hearing from you!
We celebrated in a bake-ly manner. The kitchen was a busy, crowded space this weekend. We tried new recipes for this blogiversary and made almond cupcakes with green tea frosting. Then, because there was so much frosting leftover, we also made macarons to use up the rest.
The almond cupcakes and the green tea frosting didn't turn out as beautiful as it did in our minds. It just shows you, even when you're celebrating, you win some and you lose some!
So we're very sorry that we can't share the recipes, the cupcakes turned out dry and the frosting was much too soft (even after multiple chilling attempts). But at least we can secretly enjoy them because they're celebratory treats.
Until next time, we hope you eat cake for breakfast, too!
Friday, August 2, 2013
Osmanthus Macarons
Hello, friends! I hope you have wonderful long weekend plans ahead of you. It's almost frightening how fast this year has gone by. Sometimes I still feel like we've just all returned from the Christmas holidays. But it's now more than halfway through the year. Yikes! I don't think I've been blogging as much as I like to be. The other day I wistfully browsed through all my cookbooks to find inspiration and energy and excitement again. I think it worked and I feel like flexing my fingers this weekend.
I made some Osmanthus macarons back in the spring and realized that I didn't share these yet! So I did some quick photo editing and posted the recipe below. To some of my local readers, you might recognize the macaron box - saved from a bakery in Toronto! Any guesses?
Osmanthus Macarons
(Makes about 50-60 shells for 25-30 filled macarons)
1 cup of egg whites (from 7-8 eggs)
2 3/4 cups of almond flour
2 3/4 cups of powdered sugar
3 tablespoons of dried Osmanthus flower
A pinch of salt
3/4 cups of granulated sugar
Separate your eggs and leave the whites out in room temperature while you prepare the flour.
In a food processor, combine the blanched almond slivers, powdered sugar, and Osmanthus flowers together. Pulse until the almond and Osmanthus flowers has been grounded to a fine flour. Be careful and do not grind it to the point where it becomes a paste.
Here comes the tedious task of sifting. I take a large deep pan and gently tap a sieve over it to sift the mixture (try that while also holding a camera). Any bits and parts that don't pass through the sieve are placed back in the food processor for some more blade action.
After, when your arms are aching from sifting, place the egg whites in your stand mixer's bowl. Using the whisk attachment, give it a low whirl to loosen up the egg whites - about a minute. Add in a pinch of salt and up the speed to medium. Pour in the granulated sugar in three parts. When it's all combined, turn the speed up again and wait for stiff peaks to form. To test, remove the whisk attachment and flip it to see if the tip of the egg whites hold or if they droop over. The mixture should feel thick and heavy.
(An aside, the brackets make this an aside, right? I recently read The ACB with Honora Lee and it inspired me to have "O is for Osmanthus" in this post. See photo above.)
Once you've achieved stiff peaks, pour about a third of the almond flour mixture in and give it a good mix so that there isn't a pile of dry almond flour in the bowl. Then add the next third, fold the mixture, and add in the final flour mixture and fold it into the mixture. You want the batter to be firm enough to hold it's shape after piping and runny enough that any lumps and bumps smooth out by itself. Almost like the consistency of yogurt or honey.
Fit your pastry bag with a large-round tip and fill it with the macaron batter. Squeeze small amounts onto your parchment paper to form 2 1/2 inch circles. You can also make them slightly smaller or larger, it's up to you! Just be consistent so you have pairs with the same size. And leave at least 1 inch of space between the piped macarons. Give the tray a good strong tap to smooth out the batter.
Preheat the oven to 300°F/150°C (325°F/162°C for non-convection oven, but we highly recommend using a convection oven). Let the macarons rest for 15 to 30 minutes. Then pop them into the oven and bake for 14 minutes. When ready, take them out to cool before lifting them off the parchment paper.
Osmanthus Pastry Cream
(Makes enough to fill the 25-30 macarons)
2 cups of milk
3 tablespoons of dried Osmanthus flower
6 egg yolks
1/2 cup of sugar
1/3 cup of cornstarch, sifted
3 1/2 tablespoons of unsalted butter
- In a small pot, bring the milk and Osmanthus to a boil, set it aside to cool for 10 minutes.
- Fill a large bowl with cold water (or ice). In a medium sized pan or small pot, whisk the egg yolks, sugar, and cornstarch together. Gradually whisk in the hot milk. Place the pan over high heat and bring it to a boil, whisking vigorously for 1 to 2 minutes. Set the bowl in the ice bath or cold water and stir until the temperature reaches 140°F (60°C) on an instant-read thermometer.
- Stir in the butter. Cool, cover, and refrigerate.
- Once the pastry cream has cooled and set, you can fill a pastry bag with it and pipe it to fill your macarons.
Friday, July 20, 2012
Pine Nut Cookies
My amazing aunt and uncle from New York City are visiting us this month. My aunt and mom went to Costco to pick up ingredients for our dinner tonight and brought back pine nuts. My aunt asked me to make pine nut cookies and my mom was going to attempt it, but she never follows recipes properly, so I took the project over.
Mom pulled out a book I bought her years ago, Biscotti, which happened to have a pine nut cookie recipe!
Pinolate (Pine Nut Cookies)
Recipe from Biscotti: Recipes from the Kitchen of the American Academy in Rome
Makes about 15-20 cookies
200 grams of pine nuts
85 grams of almonds
85 grams + 3 tablespoons of granulated sugar
2 grams of lemon zest
1/4 teaspoon of vanilla extract
1 egg white
Best of all, my aunt said they were as good as the ones she gets from the Italian bakery in New York! =)
Mom pulled out a book I bought her years ago, Biscotti, which happened to have a pine nut cookie recipe!
Pinolate (Pine Nut Cookies)
Recipe from Biscotti: Recipes from the Kitchen of the American Academy in Rome
Makes about 15-20 cookies
200 grams of pine nuts
85 grams of almonds
85 grams + 3 tablespoons of granulated sugar
2 grams of lemon zest
1/4 teaspoon of vanilla extract
1 egg white
- Preheat your oven to 150°C (300°F).
- Spread the pine nuts on a cookie sheet and toast for 10 minutes. Let it cool.
- Using a food processor, pulse the almonds, granulated sugar, and 50 grams of the toasted pine nuts until they become sandy in texture.
- Transfer the nuts and sugar to a mixing bowl. Add the lemon zest, vanilla extract, and egg white. Mix well.
- Cover the dough and refrigerate for 30 minutes.
- Preheat your oven to 160°C (325°F).
- Form the dough into cherry-sized balls and roll each ball in the remaining toasted pine nuts.
- Evenly space the dough on a cookie sheet lined with parchment paper, leaving about 2cm (1.5 inches) between each cookie.
- Bake for 9-10 minutes, until golden brown.
- Eat these cookies, they're best on the day of, but will keep for up to 1 week in a sealed container.
Best of all, my aunt said they were as good as the ones she gets from the Italian bakery in New York! =)
Wednesday, March 7, 2012
Subscribe to:
Posts (Atom)