WE'VE MOVED

Hello!

Thank you for the amazing 8 years here at A Baked Creation, we can't thank you enough for the memories! But we've decided to move over to a new site - Sincerely, Syl. Please join us there for future posts on all the things you loved here!

Sincerely,
Syl
Showing posts with label crispearls. Show all posts

Sunday, June 26, 2016

Strawberry Matcha Éclairs

Well, since my Totoro puffs didn't turn out the way I imagined them to, I thought I would work on some éclairs instead. The good thing is, the choux dough recipe is the same (so refer back to the Totoro post), the only thing you do differently is how you pipe them out.
And you know what? You're supposed to use a star tip, but I couldn't find mine. It's probably at my parent's house - all my baking supplies are now split apart because my condo can't fit everything. But the éclairs turned out just fine with a round piping tip.
After the éclairs cool, cut them in half so that you have your elongated boats. If you made the choux dough correctly, the interiors should be semi-hollow.
It's strawberry season again (yay) so I chopped them up into tiny little cubes. Then sprinkled a teaspoon of sugar on it, gave it a toss, and had it macerate for a bit. It's sitting in a sieve so that any excess liquids can drain off.
Using tiny dessert spoons, I filled the with the strawberries I so painstakingly sliced.
Then came the fun part, decorating with matcha buttercream! I was originally going to make matcha pastry cream, but realized I finished using all the milk on the choux dough. Oops! Oh well, it worked out in the end as buttercream is so much easier to make and also pipes out beautifully.
Doesn't the smooth matcha buttercream look like avocado? In fact, these éclairs remind me of sub sandwiches or avocado toast. I know you're supposed to put the tops back on the éclairs . . . but they're so much prettier when they're like an open-faced sandwich!
You can also pipe the buttercream in first and then top it with strawberries. Don't forget to decorate! I had sprinkles and milk chocolate crispearls on hand. You can also switch out your piping tip for different designs.

Howard's colleagues are going to have a happy Monday eating these (I hope)! There's too many for Howard and I to finish. There's also a key lime pie in the freezer, but more about that later.

Saturday, July 5, 2014

No-Bake Mini Cheesecake Blossoms

Beauty! These no-bake mini cheesecake blossoms were so fun to make, mainly because I love desserts that feature some kind of floral decoration. What can I say? I love it when I get flowers!

Now, I've made my fair amount of cheesecakes before, and always found it agonizing when you place it in the oven and cross your fingers that it bakes evenly. Nobody wants cracks to show up on the surface of a perfectly smooth cheesecake. And there's the bain marie (or water bath) that you have to deal with. So if you're on the lookout for a no-bake recipe, this is one to try.

No-Bake Mini Cheesecake Blossoms
Shopping List: cream cheese, sweetened condense milk, icing sugar, vanilla extract, unflavoured gelatin, chocolate sandwich cookies, and fruit.

Let the cream cheese rest in room temperature for about an hour or so. Letting it soften up helps the mixing process a lot!

This is pretty simple and having a stand mixer makes it even easier. You throw in the cream cheese, sweetened condense milk, icing sugar, and vanilla extract and beat it until it's smooth.

In a small bowl, you mix the gelatin with boiling water and stir until it dissolves. Then add the gelatin into the cream cheese mixture.
Fill a piping bag with the batter and pipe cream cheese to cover the bottom of the mini cupcake liners or mini dessert jars. A good friend of ours bought me a set of mini dessert jars for my birthday and I was pretty excited to use them. The glasses are about two inches tall and I was able to fill nine of them. The recipe yields about 24 for mini cupcake liners.
Place one cookie (I used regular sized chocolate sandwich cookies, but use the mini versions if you're going with mini cupcake liners) in each and press it down so that some of the batter comes up on the sides. Pipe on the remaining cheesecake batter to cover the cookies.

Refrigerate for at least three hours or overnight.
I'm deviating a bit here, so if you're up for mango blossoms, read on. If you want other blossom ideas, watch this video to see how easy it is to decorate your cheesecakes with fruit.

Remove the skin from the ripe mango and slice all four sides around the mango seed. Next, lay the pieces down thinly slice them so you have many semi-circle pieces. Picking the right mango is crucial as you don't want one that is too firm because it won't bend and might break, and you don't want one that is too ripe for it'll become mushy if you try to curve it.
To create the blossom, take one of the shorter slices of mango and curl it up to form the middle of the bud. Place it in the middle of the cheesecake. Then, take medium slices and wrap it around. You want the curve side facing up and the straight edge on the cheesecake. Keep surrounding the middle piece with mango slices until you reach the edge of your bowl or cupcake liner.
You can probably work the opposite way and go outside in if that's easier. You also don't have to place the bud in the middle! Even if you start on the side, just keeping adding mango slices for a lovely layered look.
You can garnish your cheesecakes with whatever you like, maybe you know some chocolate fans, add some chocolate crisps or chop up your favourite candy. Drizzle on caramel sauce. Add dollops of jam and cream. But guys? Blossoms are pretty and impressive. ;)

Share your no-bake mini cheesecake blossom snapshots with @canadianliving on Twitter, Facebook, and Instagram with the hashtag #CLIMadeIt.

Disclaimer: This is a sponsored post by Canadian Living and I received compensation for it. There was no requirement to produce a positive review of this recipe. All opinions are our own.

Thursday, September 27, 2012

Chocolate and Peanut Butter Pots de Crème

Last weekend, we were invited to a dinner party (in which the hosts didn't have to do any of the cooking - now that's my kind of magical, we'll leave you to figure it out) and we called dibs on bringing dessert. We always try not to show up empty handed!

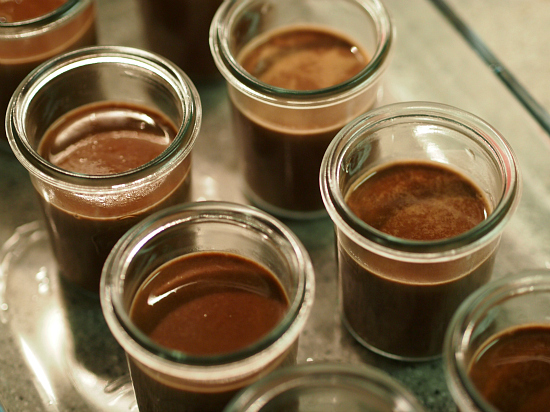
So some ideas were milling about, we really wanted to do something with our jars again, since they would be perfect individual portions and easy to bring over to their house. No amount of rocking will smudge or ruin these desserts. Our hosts like the chocolate and peanut butter combination, so we were thinking of chocolate pots de crème and adding some peanut butter element into it.

During the week, we happened upon the blog, Tar-Tryin', where Emily blogs through the Tartine cookbook. An amazing feat no doubt, but it was a sign. She's made the chocolate pots de crème recipe from the book! Next thing you know, we're pulling out our Tartine cookbook off the shelf and going on a grocery trip.

Minor variations in our recipe - just a swap of chocolate type. We melted 5 ounces of semisweet chocolate and 1 ounce of REESE'S Minis over a double boiler. Next, we combined 2 3/4 cups of heavy cream, 3 tablespoons of sugar, and 1/8 teaspoon of salt in a sauce pan and whisked until it was blended. Once it started to boil, we took it off the heat and whisked in the chocolate.

We preheated the oven to 175°C (350°F). Now, using our stand mixer, we whisked 8 large egg yolks until combined (save the egg whites - you'll need them for our next post). Then slowly poured in the chocolate mixture as the machine continued to whisk. Once it was all blended together, poured the mixture through a fine sieve into a container with a spout.

Next, we divided the chocolate mixture among 8 oven-proof jars. Placed them in an oven-proof pan and popped it into our oven. Using a kettle or container with a spout, we poured water into the pan so that it came up 3/4 of the way up the sides of the jars.

Baked for about 20-25 minutes. The sides and top were set, but the middle of the crème was still jiggly.

We carefully removed our jars from the oven. If you can carry the whole water bath out - we give you thumbs up! We were cautious and took the jars out individually (chicken!), since we couldn't guarantee that we would carry it out without any hot water sloshing onto the floor!

While the chocolate pots de crème are cooling, we worked on garnishing. From our bag of leftover REESE'S Minis, we quartered each piece. There's something fun about chopping up peanut butter cups....

Once our desserts are completely cooled, we garnished the top with the chopped peanut butter cups and added some Callebaut Crispearls for a crunchy texture. Or, whatever chocolate and peanut butter goodness you like!

Mmm, can't wait to dig in!

Now, to store them for safe travels. If you have seals and lids for your jars, put them on!

Clamp them down!

Ready to go! They're very cute in presentation and great for placing out in a potluck or buffet style dinner party. Just place a spoon on the top of the jar and guests can grab one whenever they feel like it.

First bite, managed to get two out of three! No Crispearls here, but the top crust of the crème will provide texture.


Monday, November 7, 2011

Chocolate Mousse

We made our first chocolate mousse dessert, and it counts towards a contest! Thomas Allen & Son Ltd. is challenging Canadian home chefs and bloggers to create recipes from Jacques Pépin's newest cookbook, Essential Pepin. I thought I would give it a try for my chance to win a copy of the cookbook.

One could make an entire Pépin meal from the three recipes provided:
a) Composed salad of greens, goat cheese, and caramelized pecans
b) Chicken in tarragon sauce
c) Chocolate mousse

Each one that you make would count as an entry. The salad and chicken was tempting, but I went for the dessert!

The recipe is pretty simple, calling for sugar, egg yolks, bittersweet/semisweet chocolate, heavy cream, and cognac/dark rum/Grand Marnier. I was probably over confident, because this dessert took us longer than I thought!

First of all, I bought table cream from Shopper's by accident. My mousse-making partner and I figured something was wrong when it wouldn't form soft peaks after intensive whipping. So we had to put our chocolate and egg yolk mixture aside and go to the supermarket.

No Frills was sold out of heavy cream! How about Wal-Mart? Crap, it wasn't a Superstore with the fridge aisles. Even our last hope, a Daisy Mart convenience store, no luck. So we went home and debated risking the mousse by using the bubbly table cream. Was everyone making desserts with heavy cream this weekend?

Then we received good news, Howard found some and brought over just enough for the recipe! Hooray, we could continue...

Unfortunately, our chocolate mixture had gotten hard by the time we finally had soft peaks from our cream. The chocolate had probably seized and started to break down. In which Pépin suggests to "immediately stir in 1 to 2 tablespoons of the whipped cream to smooth out the mixture."

Oh crap again. We didn't get a chance to do that "immediately" because we didn't have whipped cream at that time.

We warmed it up again and tried our best to salvage it. Then we folded in the whipped cream until it was as smooth as it could get.

Then, we funneled the mixture into four cups and one take-out container for my mousse-making partner to take some home (it made six servings - perfect). We didn't end up chilling it for two hours because we were keen on decorating them before the sun went down.

For two of the glasses, we piped little poofs on top of the already firmed mousse with the whipped cream we set aside. Then sprinkled some cinnamon on it. For the other two, we added a layer of milk chocolate Crispearls and then piped on whipped cream. Yum!

And for some odd reason, we had it in our heads that we were making chocolate pudding that day. Some weird switch must have happened in my mind, so when it didn't turn out jiggly, we thought we made it wrong. But upon checking the recipe title, we realized that it was correct! What a day of ups and downs!

Tuesday, October 18, 2011

Miette

Happy National Chocolate Cupcake Day! That's right, put October 18 in your calendar so you won't forget. I can't be reminding you every year. ;)

To celebrate, I would like to share a new chocolate cupcake discovery. This year, I made Miette's double chocolate cupcakes three times.

But, let me rewind a bit. The cover of this cookbook caught my eyes. It was such a simple cake (called the Tomboy), but conveyed so much charm that I looked up the Miette bakery in San Francisco. The website made me want to visit San Francisco - soon (fingers crossed)!

Then, there was this cute video from the publisher:
Written by Meg Ray, with Leslie Jonath
Photographs by Frankie Frankeny

ISBN 13: 9780811875042
ISBN 10: 0811875040
Publisher: Chronicle Books
Hardcover: 224 pages

I could not wait for this book to be released! I liked the way Meg Ray thinks, a piece of cake every morning!

Sadly, the pistachio and strawberry cake she makes in the video is not in the cookbook. =(

Scalloped edges. As if this book needed to be any more charming!

What I actually liked most about the book is the portion of Ray's dessert recipes. The cakes are smaller in size, 6-inch to be exact. Perfect for me, I like small desserts!

Back to the cupcakes, I made them three times because they were good. They were moist, soft, and rich with chocolate flavour. For some magical reason, these cupcakes were the most evenly and uniformed looking cupcakes I've ever made. These are now my go-to chocolate cupcakes. =)

Double Chocolate Cupcakes
From Miette
(Makes about 24 cupcakes)

1½ cups of all-purpose flour
1¼ cups of natural unsweetened cocoa powder
1½ teaspoon of baking soda
½ teaspoon of baking powder
¾ teaspoon of kosher salt
2 ounces of 70% cacao chocolate, coarsely chopped
1 cup of boiling water
1 cup of buttermilk
½ teaspoon of vanilla extract
2 large eggs, at room temperature
½ cup of vegetable oil
2¼ cups of sugar
  1. Preheat the oven to 180°C (350°F) and have all ingredients at room temperature. Place your cupcake liners in the tray.
  2. Sift the flour, cocoa powder, baking soda, baking powder, and salt together.
  3. Put the chocolate in a heatproof bowl and pour the boiling water in. Whisk until the chocolate has melted. Set aside to cool for about 15 minutes.
  4. In a separate bowl, whisk the buttermilk and vanilla together.
  5. Using a stand mixer, whisk the eggs on high speed until foamy (about 2 minutes). On low speed, add the oil. On medium speed, whisk until combined.
  6. Once again, on low speed, add the chocolate mixture into the egg mixture. Then, add the buttermilk and vanilla mixture. Add the sugar and whisk until the batter is smooth (about 2 minutes).
  7. Remove the bowl from the stand mixer and add the dry ingredients. Mix and fold using a rubber spatula, it's okay if the batter looks a bit lumpy. Don't over mix.
  8. Pour the batter through a mesh sieve to remove any lumps. Divide the batter evenly into the cupcake liners using an ice cream scoop.
  9. Bake for about 45 minutes or until the tops spring back when lightly pressed or until a cake tester comes out clean after being inserted.
  10. Remove the cupcakes from the oven and let it cool. Make sure they are completely cooled before decorating.
I frosted mine with a light green tea buttercream and sprinkled milk chocolate Callebaut crispearls on top.

Muah! Even chocolate loves chocolate.

Disclaimer: A review copy of Miette was sent to us for review from Danielle Johnson at Raincoast Books. Thank you! No incentives were used to produce a positive review of this book.